

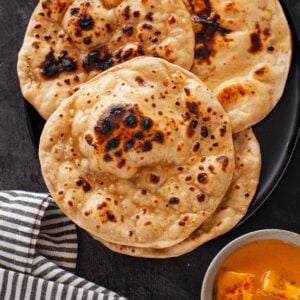
Whip up these delightful whole wheat tandoori rotis, perfectly crispy on the edges and soft in the center, right in your kitchen with this easy recipe. You won't need any fancy appliances or an oven-just a trusty old tawa (iron griddle) will do the trick! Lots of tips and step by step included!

Save The Recipe!
Being from north india, my love for Indian flatbreads runs deep. Almost everyday, I make basic roti which is simply made with whole wheat flour(atta) and water.Growing up, whenever we had guests visiting, mom would prepare tandoori rotis or tawa naan at home.
Sometimes she'd prepare the dough and send us to a nearby dhaba(road side diner), where the dhaba wala would roll and cook the rotis in his tandoor. I don't have dhaba nearby, but whenever we eat out at indian restaurants, while the rest of family orders naan, I always go for tandoori rotis.
Over the years, I've perfected recipes of our restaurant favorite flatbreads. And the best part? I am here to share with you everything I have learned in my journey!
What is Tandoori Roti
Tandoori roti is a whole wheat flatbread cooked in tandoor oven (clay oven). The rolled dough is stuck to the walls of tandoor and due to quick cooking on high heat, the roti acquires a charred puffy exterior and a smoky flavor while the inside remain soft and chewy. Once cooked, they are smeared with generous amounts of ghee or butter before serving (hence many people call them butter roti too).
At home, to replicate the taste and texture, we are going to brush one side of rolled dough with little water (my dad called these "paani vali roti" for this reason). Then, stick the rotis on a hot tawa. Let puff up and then flip the tawa to cook the other side directly over flame until dark brown charred spots appear. Gives awesome results!
Tandoori Roti versus Naan
In indian restaurants in US, you will extensively find both naan and tandoori roti on the menu. Both flatbreads are amazing and it really comes down to personal preferences when it comes to ordering them. Here are a few difference:-
- Naan is traditionally made with maida (all purpose flour), while tandoori roti is made with whole wheat flour or a combination of whole wheat and all purpose flours.
- Naan has a soft and pillowy texture, while tandoori rotis have a distinct chewy texture and crispy edges.
- Authentic naan is a leavened bread consisting of yeast, while tandoori roti recipe does not use yeast.

Few Highlights of My Recipe
- In restaurants, they often mix atta with maida, but I stick to pure atta in my recipe. Unlike the roller-milled whole wheat flour commonly found in US stores, atta, which is stone-ground (chakki-ground), has a finer texture. I've found that using Indian atta is essential for capturing the authentic taste and texture of these rotis.
- Though many people make unleavened tandoori rotis, I incorporate a mix of baking powder, yogurt, and baking soda in mine.The addition of yogurt not only imparts softness to the dough but also ensures a pleasant chewiness, even after roti has cooked directly over flame.
Best Pan To Make Tandoori Roti
- If you have one, use desi style heavy iron griddle (lohe ka tawa) or cast iron griddle. Cast iron skillet or griddles with long handles are seriously the best for making tandoori rotis.
- You can use a cast iron wok or dutch oven for cooking tandoori roti over direct flame. Their concave shape is perfect for this task. However, be cautious when handling since due to their large size, shape, and sometimes small handles, it could get unsafe.
- Regular non-coated stainless steel pans or skillets are a good choice too.
- My mom uses wide-mouthed pressure cooker that are made with aluminium.
- Avoid using nonstick pans, ceramic-coated pans, hybrid cookware, or any griddles with non-stick coating for making tandoori roti. These surfaces prevent the roti from sticking.
5 Tips for Perfect Tandoori Roti
- Dough - Make a soft and pliable dough. The dough should be soft to the touch, but not sticky. If you will make a smooth dough, your rotis will have a smooth edges because the dough will be easier to roll. Conversely, if the dough is too firm or tight, your rotis will taste dry and while rolling they will get cracked edges.
- Rest The Dough - When we knead the roti dough, we are basically working up the gluten in the flour. Resting the dough helps hydrate the flour as well as relax the gluten and the dough becomes pliable, hence softer, delicious tandoori rotis.
- Rolling- Roll the tandoori roti thicker than basic rotis. This contributes to the soft center of the rotis.
- Don't skip the salt in the recipe. I tested it with both salted and unsalted dough, and the salted version tasted and felt better. Since these rotis are thicker than home-style ones, a bite of well-seasoned dough definitely enhances the taste.
- Cook Quickly - My biggest learning was from initial attempts when some rotis fell off the griddle because I left them too long on the hot surface. The water, acting as glue, evaporated, causing the roti to slide off when I flip the tawa. We have to let the roti puff for 20-30 seconds and immediately flip the tawa to cook on other side.
Ingredients

- Atta (Indian wholewheat flour) - I like using Ashirvaad (non affiliate link) atta. You could use multigrain atta if you wish. If you want, you can use a mix of atta and all purpose flour.
- Yogurt - While I prefer plain whole milk greek yogurt, regular plain yogurt or Indian-style dahi (curd) also gives excellent results.
- Avocado Oil - Or use any neutral oil. I don't prefer olive oil since it interferes with the taste of roti.
- Rest of The Ingredients - Baking powder, baking soda, salt & water
- Ghee- For smearing on cooked tandoori roti. You could use butter or leave them as it is if you wish.
Instructions
Prepare The Dough
- In a large mixing bowl, add the flour, salt, baking powder, baking soda, oil and yogurt.
- Using your fingers, work the flour mixture so that the yogurt is incorporated.


- Gradually add water and knead to form a soft pilable dough. The dough should be soft but not sticky. If you want to use stand mixer or food processor for making the dough, absolutely go for it!
- Cover the dough with a damp cloth and let it rest for about 30-35 minutes.


Preheat Tawa on Stovetop
5. Place a clean cast iron griddle (concave iron tawa or a flat pan) over high heat and let it get very hot. Make sure that the iron pan is not greasy. If there is oil on there, the roti won't stick. I used a 10 inch cast iron griddle, you can use any size tawa that you have at home, just make sure that its larger than your roti size.
Divide & Roll The Dough
- Divide the rested dough into 6 or 7 equal parts. For consistent-sized rotis, you could use a food scale to weigh the dough portions. Adjust the size of the rotis to your preference, whether big or small, and portion the dough accordingly.
- Roll the dough portions between your palms into smooth balls. Keep the dough balls covered while you roll them one by one.
- Lightly dust your work surface as well as the rolling pin with dry flour. Take one dough ball, sprinkle dry flour on it and roll it out into a circle, about 6-8 inches in diameter, using a rolling pin. You could roll into an oval shape too. Dust with flour as needed to prevent sticking. Don't roll very thin


Cooking
- Brush off excess flour from the roti before applying the water.
- Generously brush water on one side of the rolled dough(½ tablespoon to 1 tablespoon).
- Lift carefully with hands and place the rolled roti on the hot skillet, wet side down. Let it cook for about 25-30 seconds until you see bubbles start to form on the surface.
- Immediately flip the tawa upside down over direct flame to cook the other side until you see brown spots. You will have to move round the tawa to make sure that all parts of roti get the char. I wear baking gloves while lifting the tawa.
- Flip the tawa back and using a flat metal or wooden spatula, remove the cooked roti from the pan. Brush it with ghee or butter for extra flavor and softness.
- Repeat the process with the remaining dough balls.


Storing
I usually make a small batch (7-8 rotis) and if we dont eat them, I store them in the fridge for 1-2 days. If you want to freeze, insert parchment paper or wax paper in between rotis so that it is easy to take them out without wrestling (yeah, they tend to stick to each other).
To reheat, I usually add them to a toaster oven preheated to 400F for 1- 2 minutes. Or if you are in a hurry, microwave for 10-15 seconds.

What to Serve with Tandoori Roti
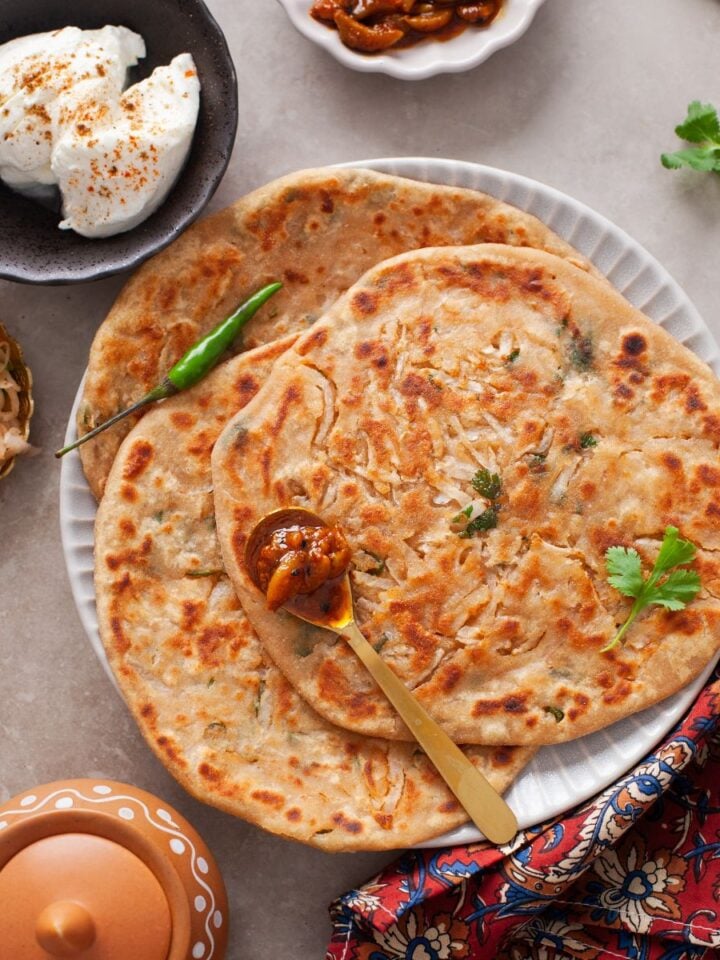
- All kinds of vegetarian and non vegetarian curries pair amazing with tandoori roti. Here in the images, I have served it with paneer korma.
- Dal (Lentils) - Dal-roti with a fresh kachumber salad and a bowl of raita is bliss any day. Dal makhani is one of my personal pairings with tandoori roti.
- Tikka and kebab with a side of green chutney and sliced onion- to die for!
- If you are a die-hard roti lover like me, you really don't need any sides. I enjoy them with humble accompaniments like yogurt, Indian pickles, or jam. However, my ultimate favorite is warm tandoori roti generously coated with ghee, sprinkled with red chili powder, and a dash of amchoor (dry mango powder).
Easy Tandoori Roti (Stove Top)
Ingredients
- 300 g atta (durum whole wheat flour) I use Ashirvaad brand
- 75 g plain greek yogurt or thick curd
- 1 teaspoon baking powder
- 2 pinch baking soda
- ½ teaspoon salt adjust to taste
- 2 tablespoon avocado oil or any neutral oil
- Room temperature water to knead the dough about ¾ cup or as needed
- Ghee or butter for smearing on cooked roti
Instructions
- In a large mixing bowl, add the flour, salt, baking powder, baking soda, oil and yogurt.
- Using your fingers, work the flour mixture so that the yogurt is incorporated.
- Gradually add water and knead to form a soft pilable dough. The dough should be soft but not sticky. You could use little oil towards the end for kneading to smoothen the dough. If you want to use stand mixer or food processor for making the dough, absolutely go for it!
- Cover the dough with a damp cloth and let it rest for about 30-35 minutes.
- Place a clean cast iron griddle (concave iron tawa or a flat pan) over high heat and let it get very hot. Make sure that the iron pan is not greasy. If there is oil on there, the roti won't stick. I used a 10 inch cast iron griddle, you can use any size tawa that you have at home, just make sure that its larger than your roti size.
- Divide the rested dough into 6 or 7 equal parts. For consistent-sized rotis, you could use a food scale to weigh the dough portions. Adjust the size of the rotis to your preference, whether big or small, and portion the dough according
- Roll the dough portions between your palms into smooth balls. Keep the dough balls covered while you roll them one by one.
- Lightly dust your work surface as well as the rolling pin with dry flour. Take one dough ball, sprinkle dry flour on it and roll it out into a circle, about 6-8 inches in diameter, using a rolling pin. You could roll into an oval shape too. Dust with flour as needed to prevent sticking. Don't roll very thin
- Using a pastry brush, brush off excess flour from the roti before applying the water.
- Generously brush water on one side of the rolled dough(½ tablespoon to 1 tablespoon).
- Lift carefully with hands and place the rolled roti on the hot skillet, wet side down. Let it cook for about 25-30 seconds until you see bubbles start to form on the surface.
- Immediately flip the tawa upside down over direct flame to cook the other side until you see brown spots. You will have to move round the tawa to make sure that all parts of roti get the char. I wear baking gloves while lifting the tawa.
- Flip the tawa back and using a flat metal or wooden spatula, remove the cooked roti from the pan. Brush it with ghee or butter for extra flavor and softness.
- Repeat the process with the remaining dough balls.
- STORING- I usually make a small batch (7-8 rotis) and if we dont eat them, I store them in the fridge for 1-2 days. If you want to freeze, insert parchment paper or wax paper in between rotis (they tend to stick to each other).To reheat, I usually add them to a toaster oven preheated to 400F for 1- 2 minutes. Or if you are in a hurry, microwave for 10-15 seconds.
Notes
- Dough - Make a soft and pliable dough. The dough should be soft to the touch, but not sticky. If you will make a smooth dough, your rotis will have a smooth edges because the dough will be easier to roll. Conversely, if the dough is too firm, your rotis will taste dry and will have cracked edges.
- Rest The Dough - When we knead the roti dough, we are basically working up the gluten in the flour. Resting the dough helps hydrate the flour as well as relax the gluten and the dough becomes pliable, hence softer, delicious tandoori rotis.
- Rolling- Roll the tandoori roti thicker than basic rotis. This contributes to the soft center of the rotis.
- Don't skip the salt in the recipe. I tested it with both salted and unsalted dough, and the salted version tasted and felt better. Since these rotis are thicker than home-style ones, a bite of well-seasoned dough definitely enhances the taste.
- Cook Quickly - My biggest learning was from initial attempts when some rotis fell off the griddle because I left them too long on the hot surface. The water, acting as glue, evaporated, causing the roti to slide off when I tried to flip it.
- All kinds of vegetarian and non vegetarian curries pair amazing with tandoori roti. Here in the images, I have served it with paneer korma.
- Dal (Lentils) - Dal-roti with a fresh kachumber salad and a bowl of raita is bliss any day. Dal makhani is one of my personal pairings with tandoori roti.
- Tikka and kebab with a side of green chutney and sliced onion- to die for!
- If you are a die-hard roti lover like me, you really don't need any sides. I enjoy them with humble accompaniments like yogurt, Indian pickles, or jam.


Priya Sebastian says
Tanvi, I have been making your recipes for years and thanks to you, the food I thought was only possible via restaurants, I can make at home. This Tandoori Roti is an example. I followed your instructions and it turned out perfectly. So easy to make and so tasty I ate it plain. Thank you once again for taking the time and the effort to share your recipes with us.
Mousumi Pan says
Beautifully stated . Your write up made me feel as If I am sitting at your kitchen counter. Making it tonight for Holi special. Thanks to you for sharing the recipe in a most simple way. Happy Holi!
Tanvi Srivastava says
I am so glad that you found the post helpful. Enjoy the recipe! Happy Holi to you as well.