

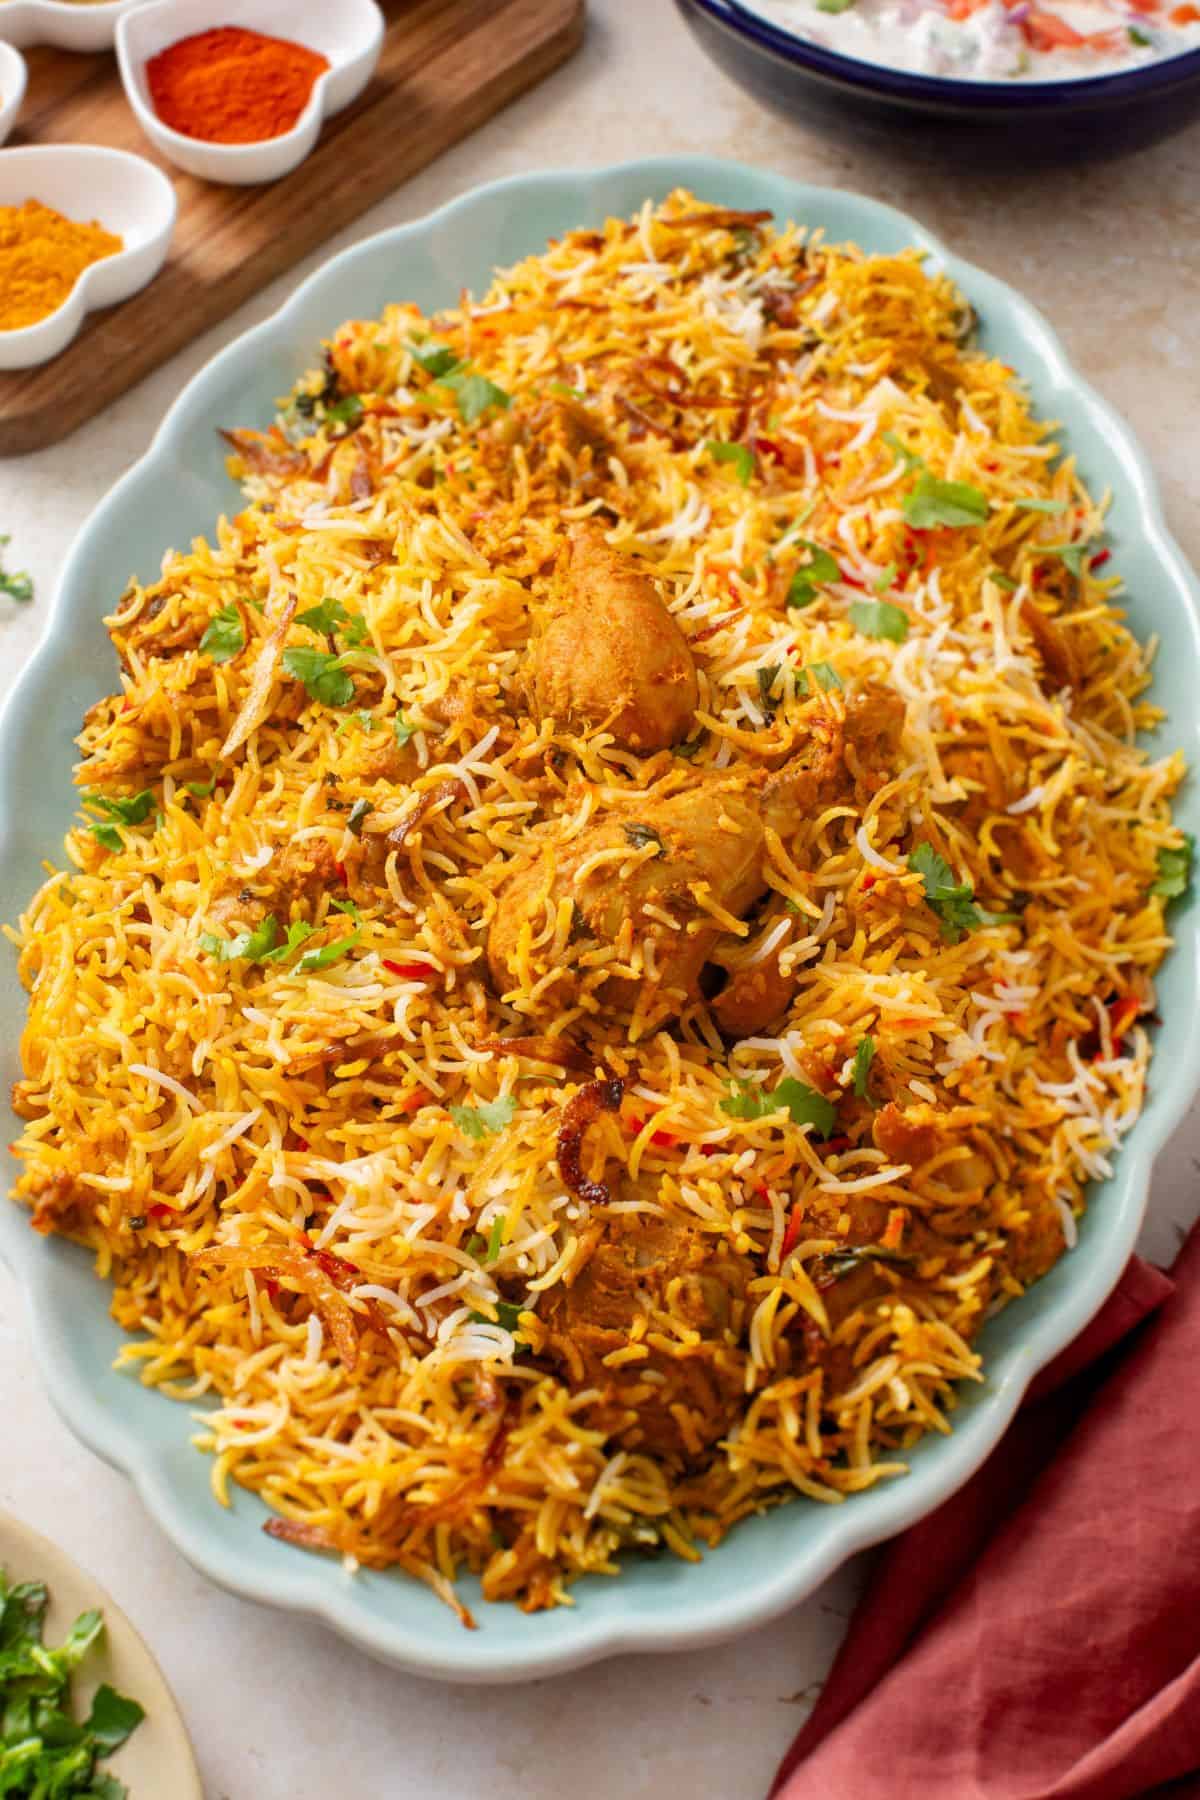
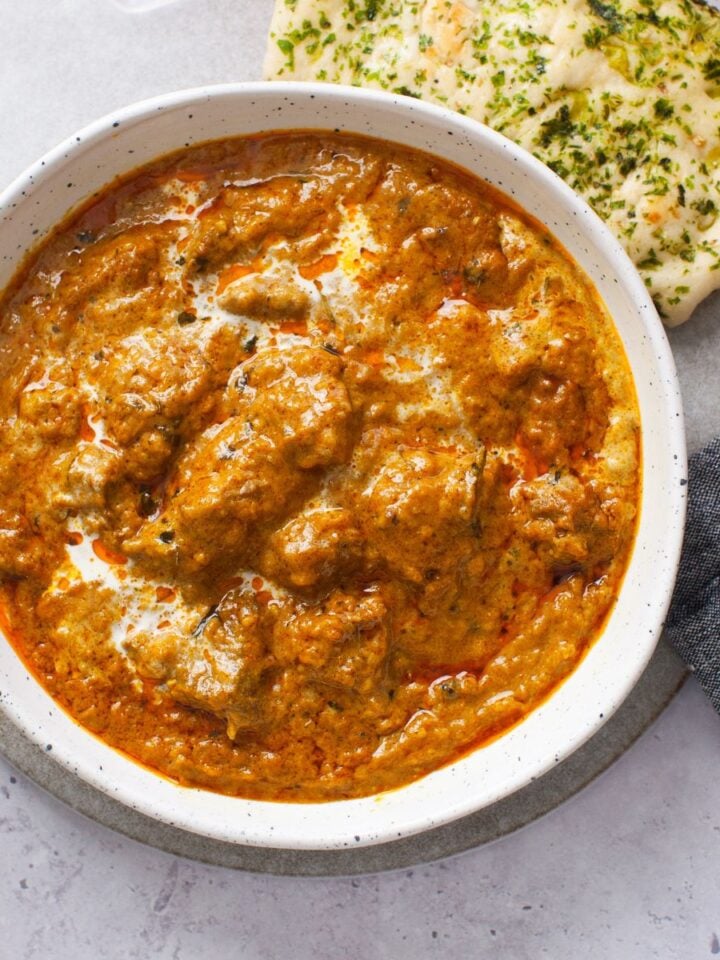
Let me introduce you to my classic chicken dum biryani that's cooked the traditional Indian way. Made with aromatic, long grain basmati rice and tender marinated chicken that is carefully layered and perfectly spiced, this crowd favorite biryani is slow cooked so all the rich flavors get time to come together beautifully. Finished with deep fried golden caramelized onions, generous sprinkles of biryani masala,ghee, fresh green herbs and touch of saffron, it is kind of comforting recipe you will want to cook again and again.
Save The Recipe!
It took me about a year and several different trials to finally feel satisfied enough to share this recipe with you. A year, you might ask? Yes, because while the process is fairly straightforward, it is definitely time consuming and not something you can pull off every week.
Then, if you want to make and truly enjoy traditional chicken biryani, there is no cutting corners on richness. Lots of oil & ghee, deep fried onions, everything plays an important role. For us, it is very much a once a month or special occasions dish, the kind you plan for, savor, and happily fit into your eating routine.
In this biryani tutorial, I have broken everything down for you, from the ideal yogurt quantity, the right amount of salt to the substitutes that work well. I will also teach you about preventing burnt bottoms and how to prevent mushy rice.
And trust me on this one! While I have been a bit cautious with saffron in my earlier biryani recipes like dum mutton biryani and anda biryani, this particular recipe truly needs it. The aroma of saffron makes all the difference here and makes the chicken biryani taste like your favorite take out!

4 Main Components of a Great Chicken Biryani
- I grew up hearing in our family that a good biryani should be so fragrant that you can smell it from seven houses away. That kind of unforgettable aroma does not happen by chance. It comes from using a aromatic biryani masala (either store bought or homemade), because the aroma of the biryani is only as good as the masala that goes into it.
- Secondly, for aroma you will need premium, aged long grain basmati rice. I prefer using sella basmati, which is a parboiled basmati rice variety commonly used in North Indian biryanis. It is immensely fragrant, and has firm textured grains that do not break easily and stay long, and separate even after layering and the prolonged steaming process. If you are new to making biryani, sella rice is very forgiving! But, if you cannot find sella basmati rice, extra long grain basmati rice is second best choice.
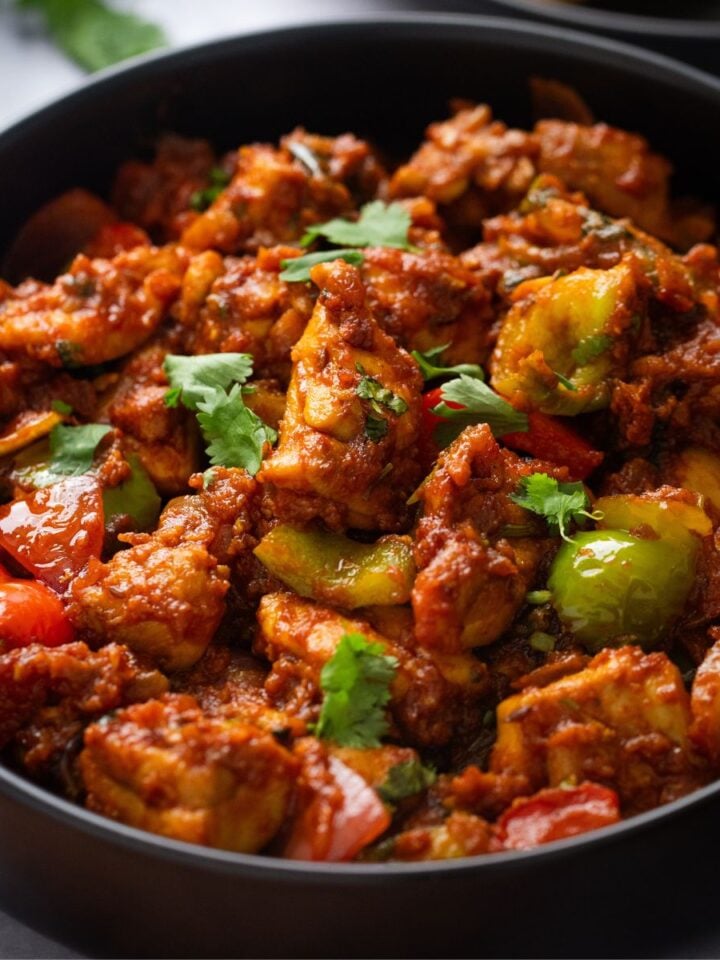
- Bone-in chicken stays tender and is a key component of a good biryani because it needs to complement, not compete with, the buttery, fluffy rice. When the chicken is soft and juicy, every bite feels balanced and cohesive. The bones add moisture and flavor as the biryani cooks, while the meat remains juicy.
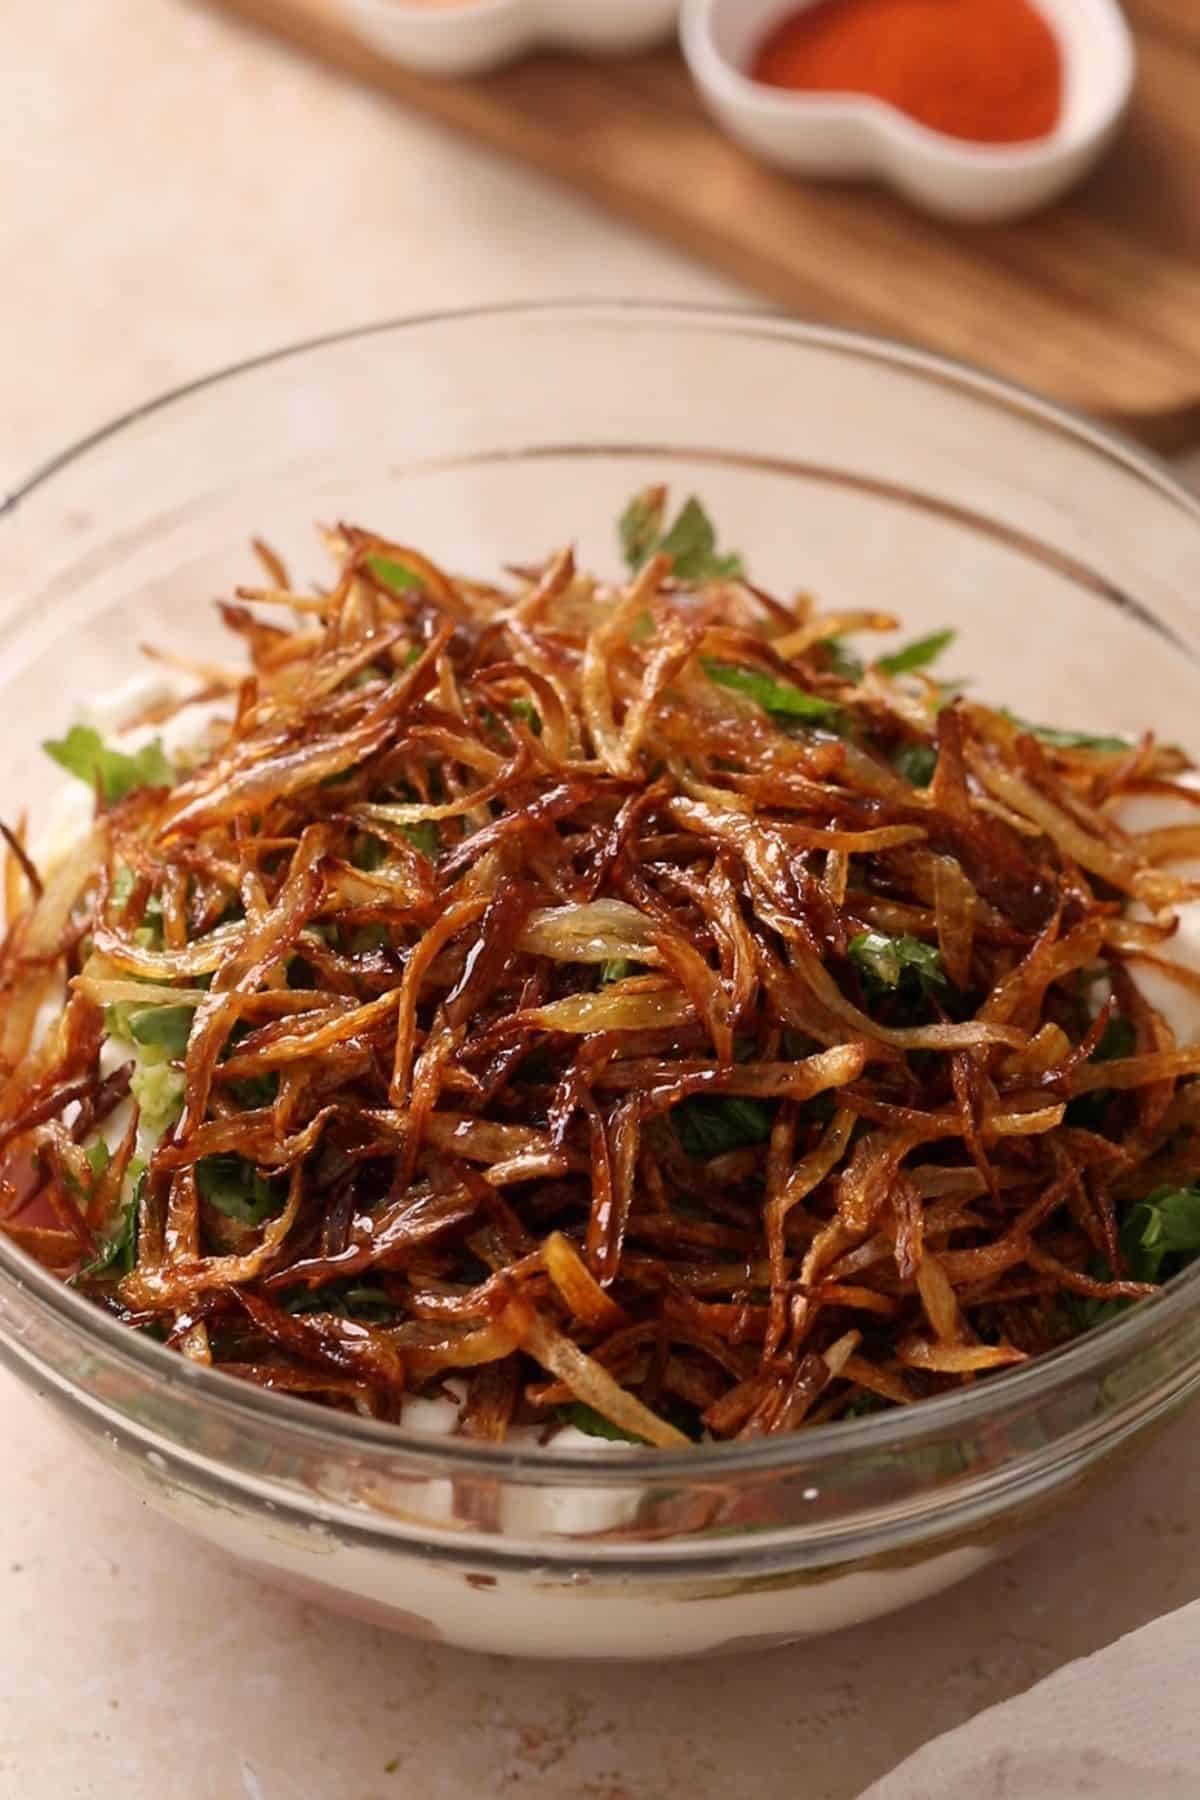
- Lastly, do not skip the birista or crispy, golden fried onions. They add sweetness, depth, and the unmistakable biryani finish! They tie all the layers together and the lacey texture after softening makes a noticeable difference in both taste and texture. Sauteed onions are not the same!
Which Chicken Cut is the Best?
In the US, whole cut up chicken chicken for curries is a bit tricky to find. You do not want very large, meaty pieces, so I do not recommend using cut up family packs available in grocery stores.
For this recipe, after testing with different chicken cuts, I settled for a mix of chicken drumsticks and chicken thighs. Since my husband prefers boneless chicken, I often go with boneless thighs, but bone-in thighs work even better.
Without a mention, you need skinless chicken! One important tip is to avoid overly large sized drumsticks or thighs, as they tend to remain bland at the center. In my experience, medium sized (palm sized) chicken pieces work absolutely perfectly for biryani.

Other Ingredients
- Onions - I prefer using yellow onions for making birista. The reason is simple. They fry up evenly and develop a beautiful golden color, unlike red onions, which can sometimes turn much darker or take on a pinkish or greenish hue. This is purely an aesthetic choice though, and either variety will work just fine. You can air fry them too as outlined in my homemade birista recipe.
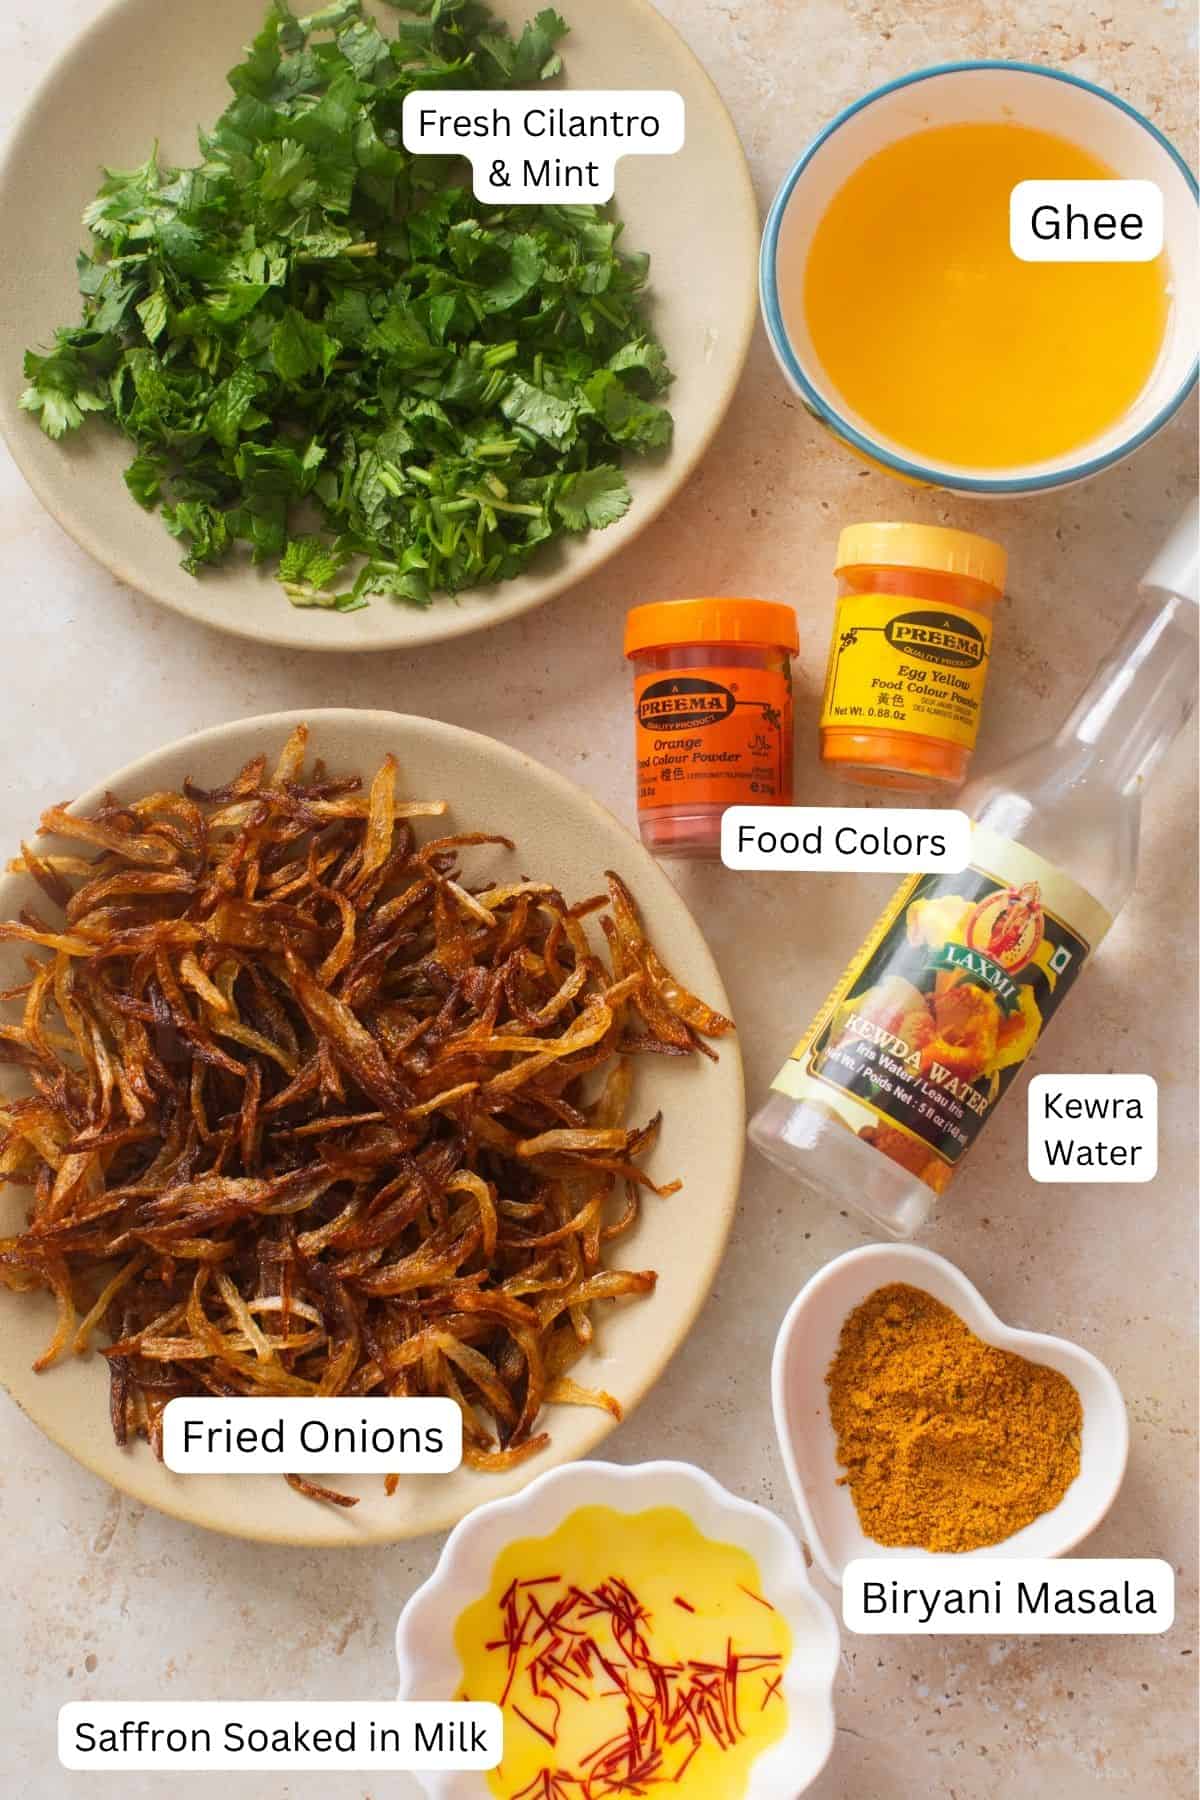
- Fresh Green Herbs - Chopped fresh cilantro stems + leaves and fresh mint are the perfect choice. After so many years of making biryani, I have figured that we need more cilantro as compared to mint since the latter can become overpowering easily.
- Yogurt -Make sure its not too sour else your biryani will become overwhelmingly tangy and one note. I use whole yogurt.
- 3 G's (Ginger Garlic & Green Chillies)- These form the flavor base of the marinade. Ginger and garlic add warmth and depth, while green chillies bring heat. I use everything fresh and grind the three into a paste. If you have garlic paste or ginger paste on hand, works well!
- Biryani Masala- Biryani masala prevents it from tasting like a curry. My homemade biryani masala is mild, aromatic and full of warmth. A little goes a long way! If using store bought, I prefer Badshah or MDH Bombay Biryani masala.
- Oil & Ghee- Please do not cut back! I use avocado oil for frying onions and leftover oil for cooking the chicken base. Ghee adds richness and the classic, comforting flavor while layering rice. The balance of both is what gives biryani its luxurious mouthfeel and prevents a sticky rice.
- Saffron - Saffron steeped in warm milk and drizzled over the top layer adds a subtle floral aroma and a beautiful color. It might seem optional, but for a truly special chicken biryani, it makes all the difference. Again, a little goes a long way.
- Kewra Water - If you are not familiar with kewra water, think of it like rose water or orange blossom water. It is a floral extract used in Indian cooking to add aroma rather than taste. Just a few drops go a long way.
- Food Color- Is used mainly for visual appeal to give biryani rice those beautiful streaks of yellow and orange. It does not add flavor, just contrast and the classic celebratory look. I use powdered food color. We need a few pinches only. You can use just one color or a combination. Can be skipped if desired.
Selecting Cooking Pots
While cooking any rice dish, including biryani, the cooking pot you choose is one of the most important factors. Select pots that are heavy bottomed and wide mouthed, as this helps distribute heat evenly and prevents the rice at the bottom from scorching.
- For deep frying brista, use a kadai or skillet that is at least 10 inches wide. I usually use a 10 inch pan, to give the onions enough room to fry evenly without crowding.
- To cook the chicken masala base, and because I use the same pot later used to assemble the biryani, I use a 14 inch cooking pot. For reference, a 6 quart wide pot, sauté pan, Dutch oven, or braiser works well as a substitute because it provides enough surface area for cooking the masala and enough capacity for layering the rice.
- For boiling the rice, use a saucepan that can comfortably hold about 8 cups of water and still allow room for the water to boil vigorously. A 4-5 quart saucepan, is the most practical size so the water does not boil over.
Instructions
Deep Fried Onions (Birista)
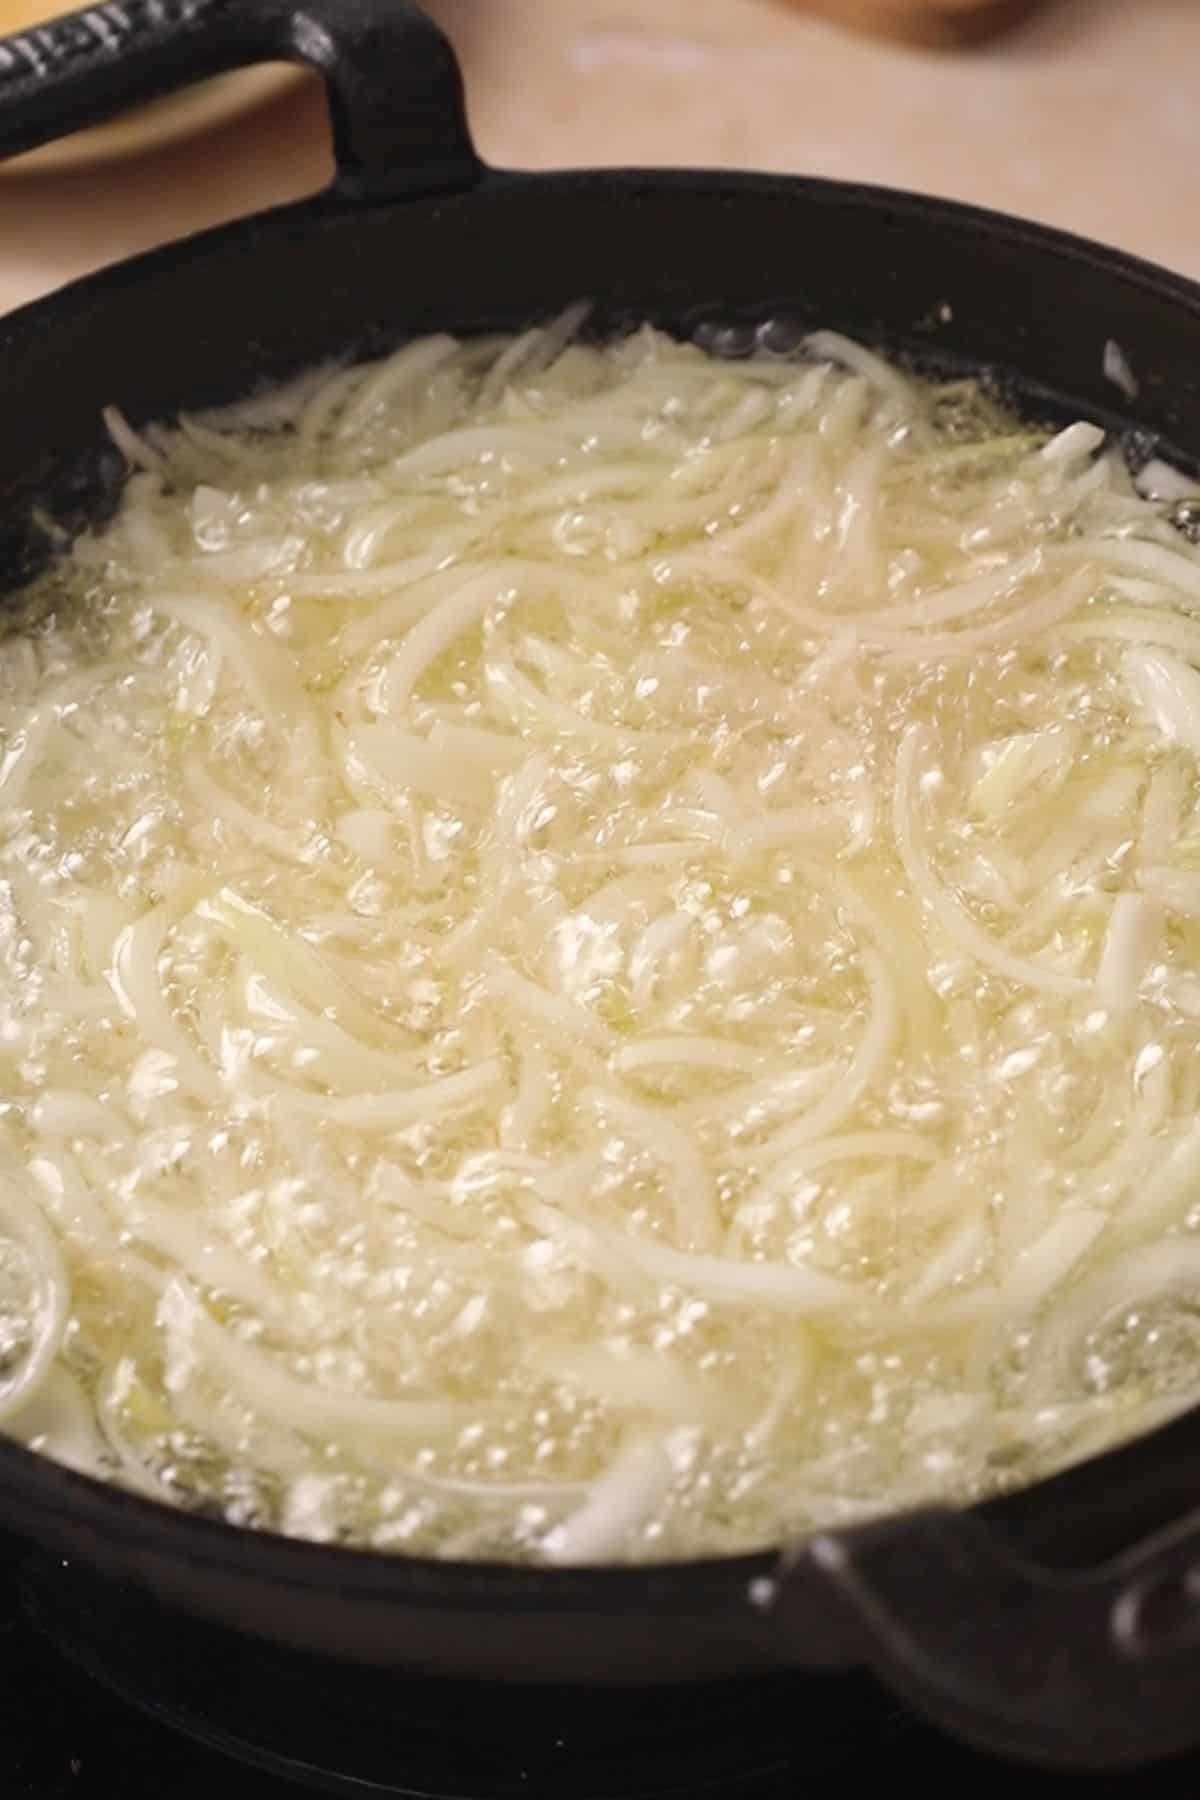
- Heat up oil in a heavy bottomed pan. Once medium hot, add the sliced onions.
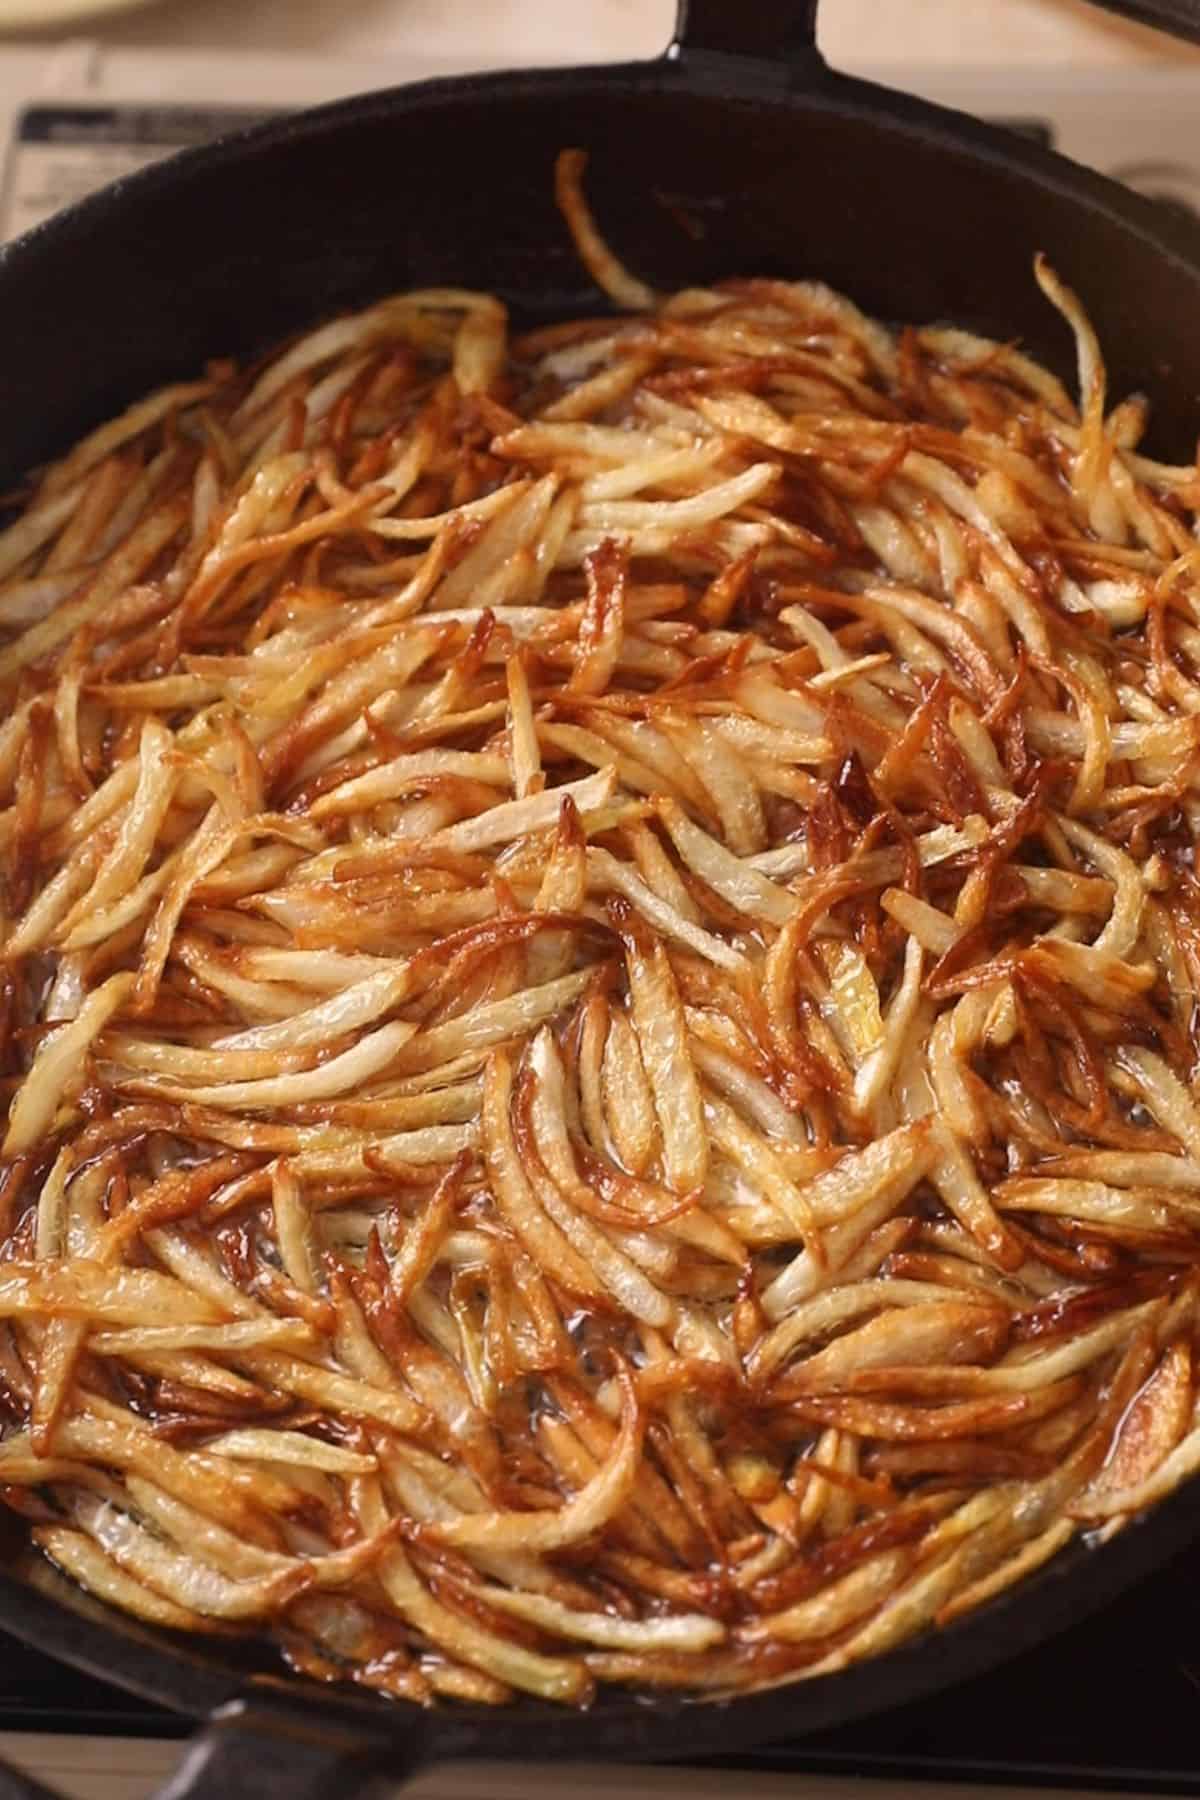
- Deep fry the onions while stirring intermittently until they start browning. We want a light golden color and then we will take them out as they continue to turn darker in residual heat.
Marinate The Chicken
- To a large bowl, chicken add the yogurt, ground spices along with ginger, green chilli and garlic paste, chopped green herbs, salt, part fried onions and part onion flavored oil.
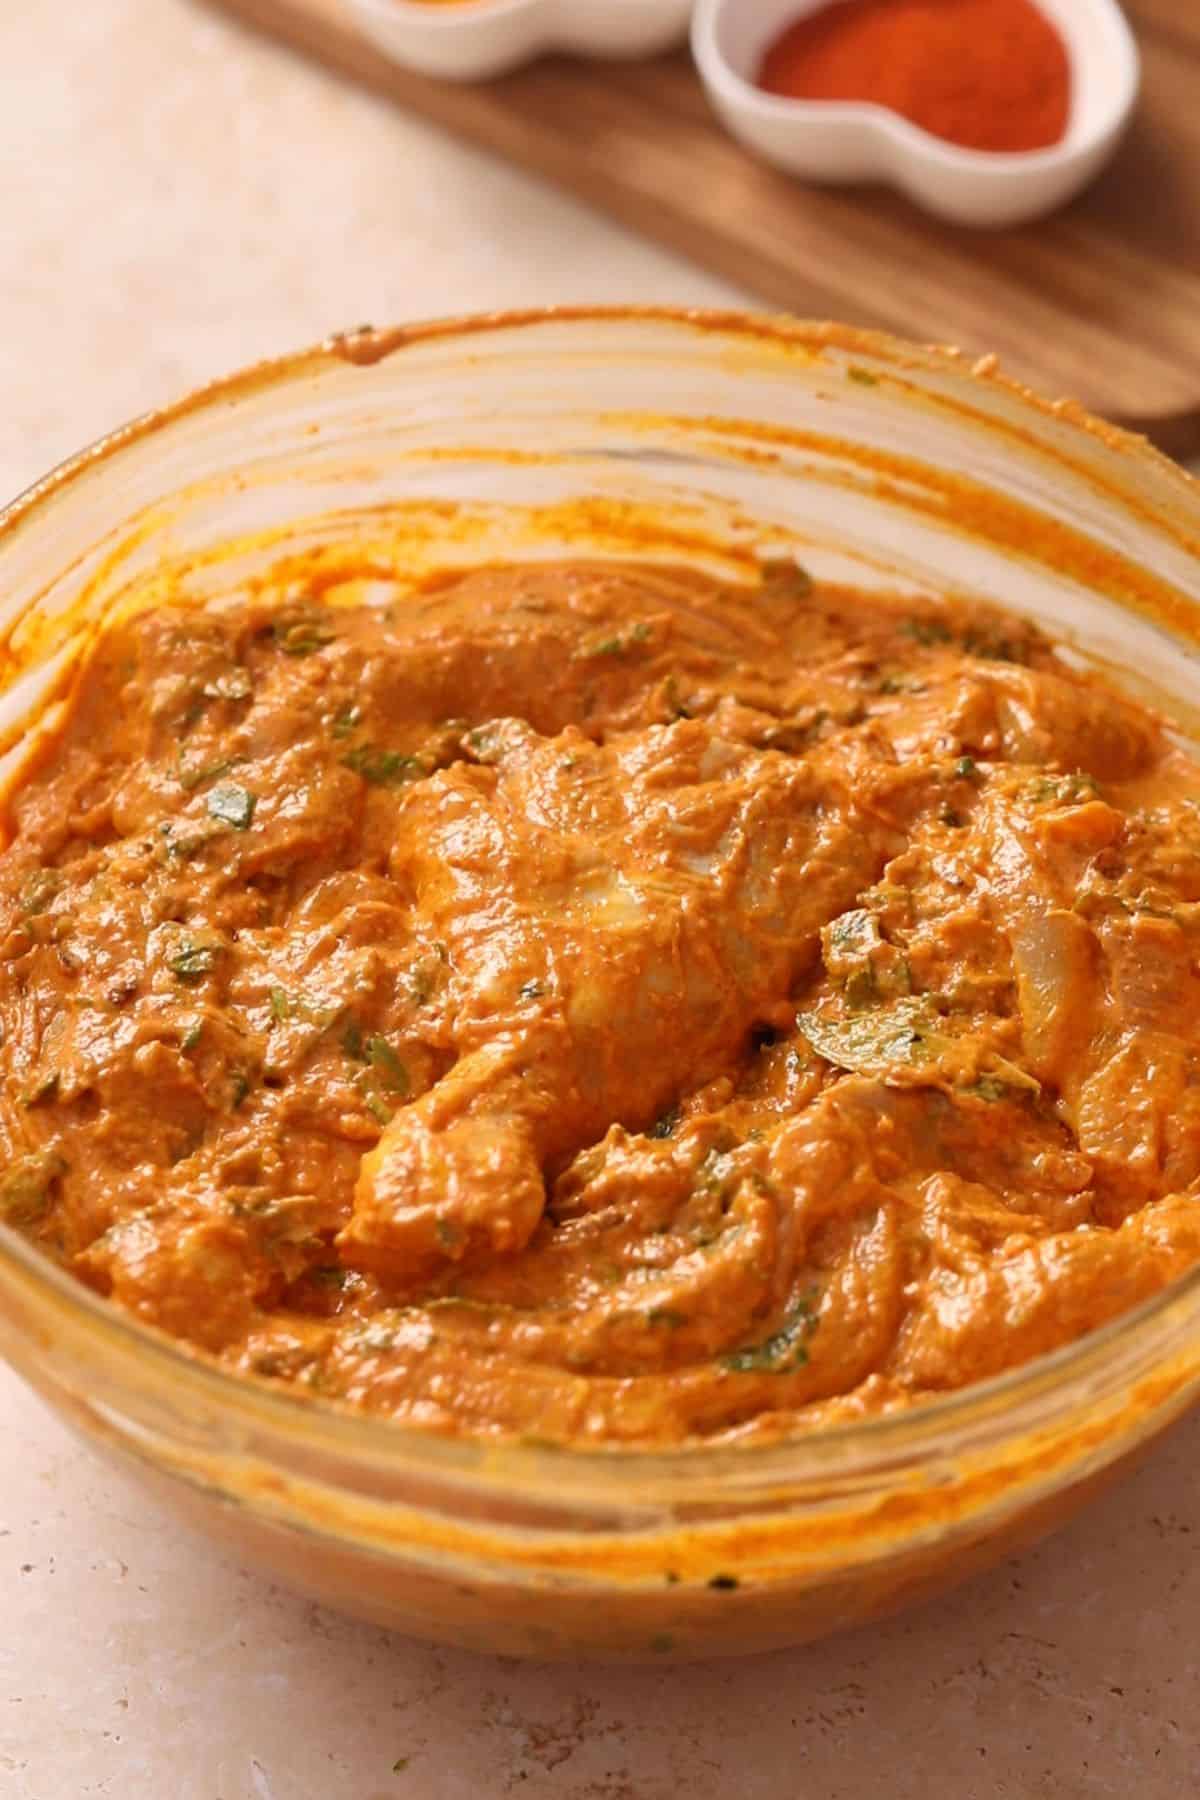
- Using your hands, mix very well, until everything is combined well and the chicken is nicely coated. Cover and leave aside for 2-3 hours to marinate.
Cook The Chicken
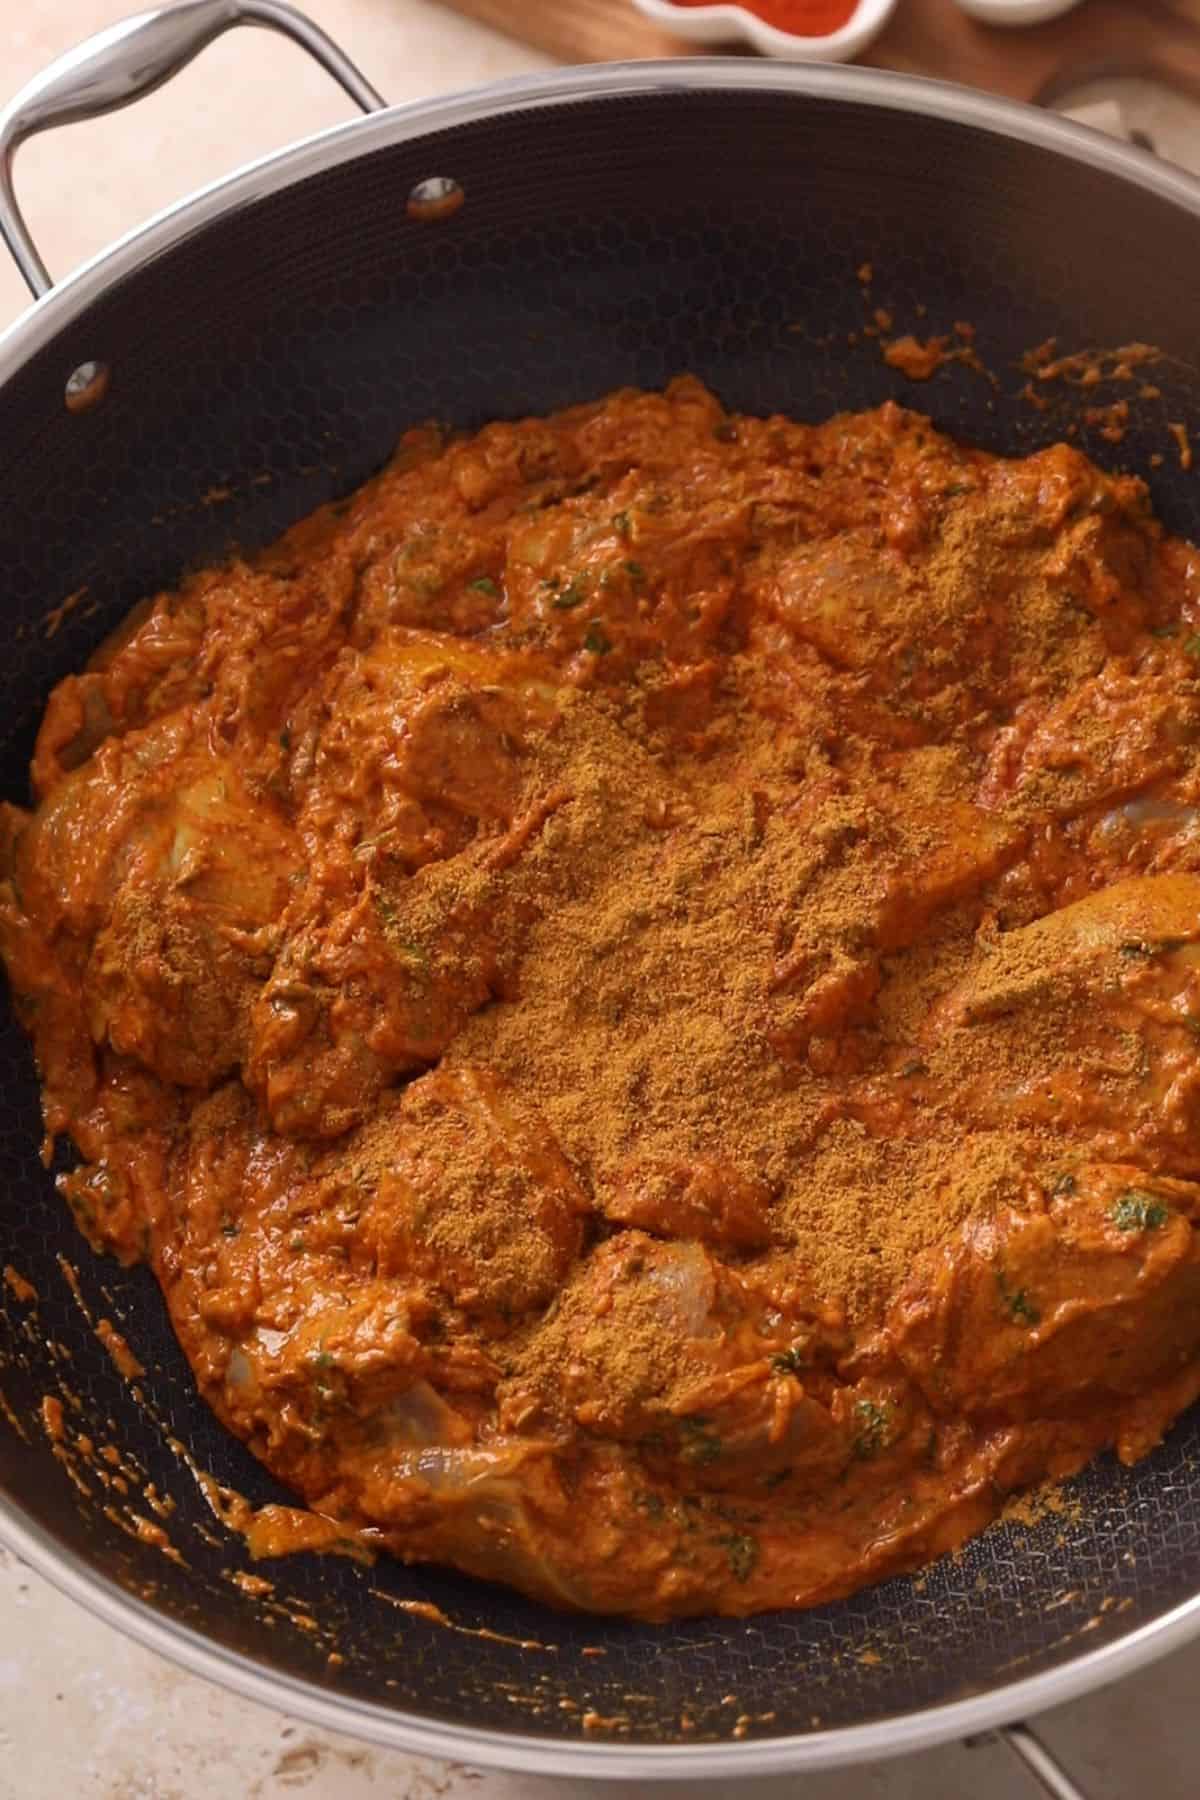
5. In a large, heavy bottomed cooking pot add the marinated chicken. Sprinkle biryani masala on top. Make sure that the pot is large enough to hold the cooked chicken and rice since we will layer the biryani in the same pot.
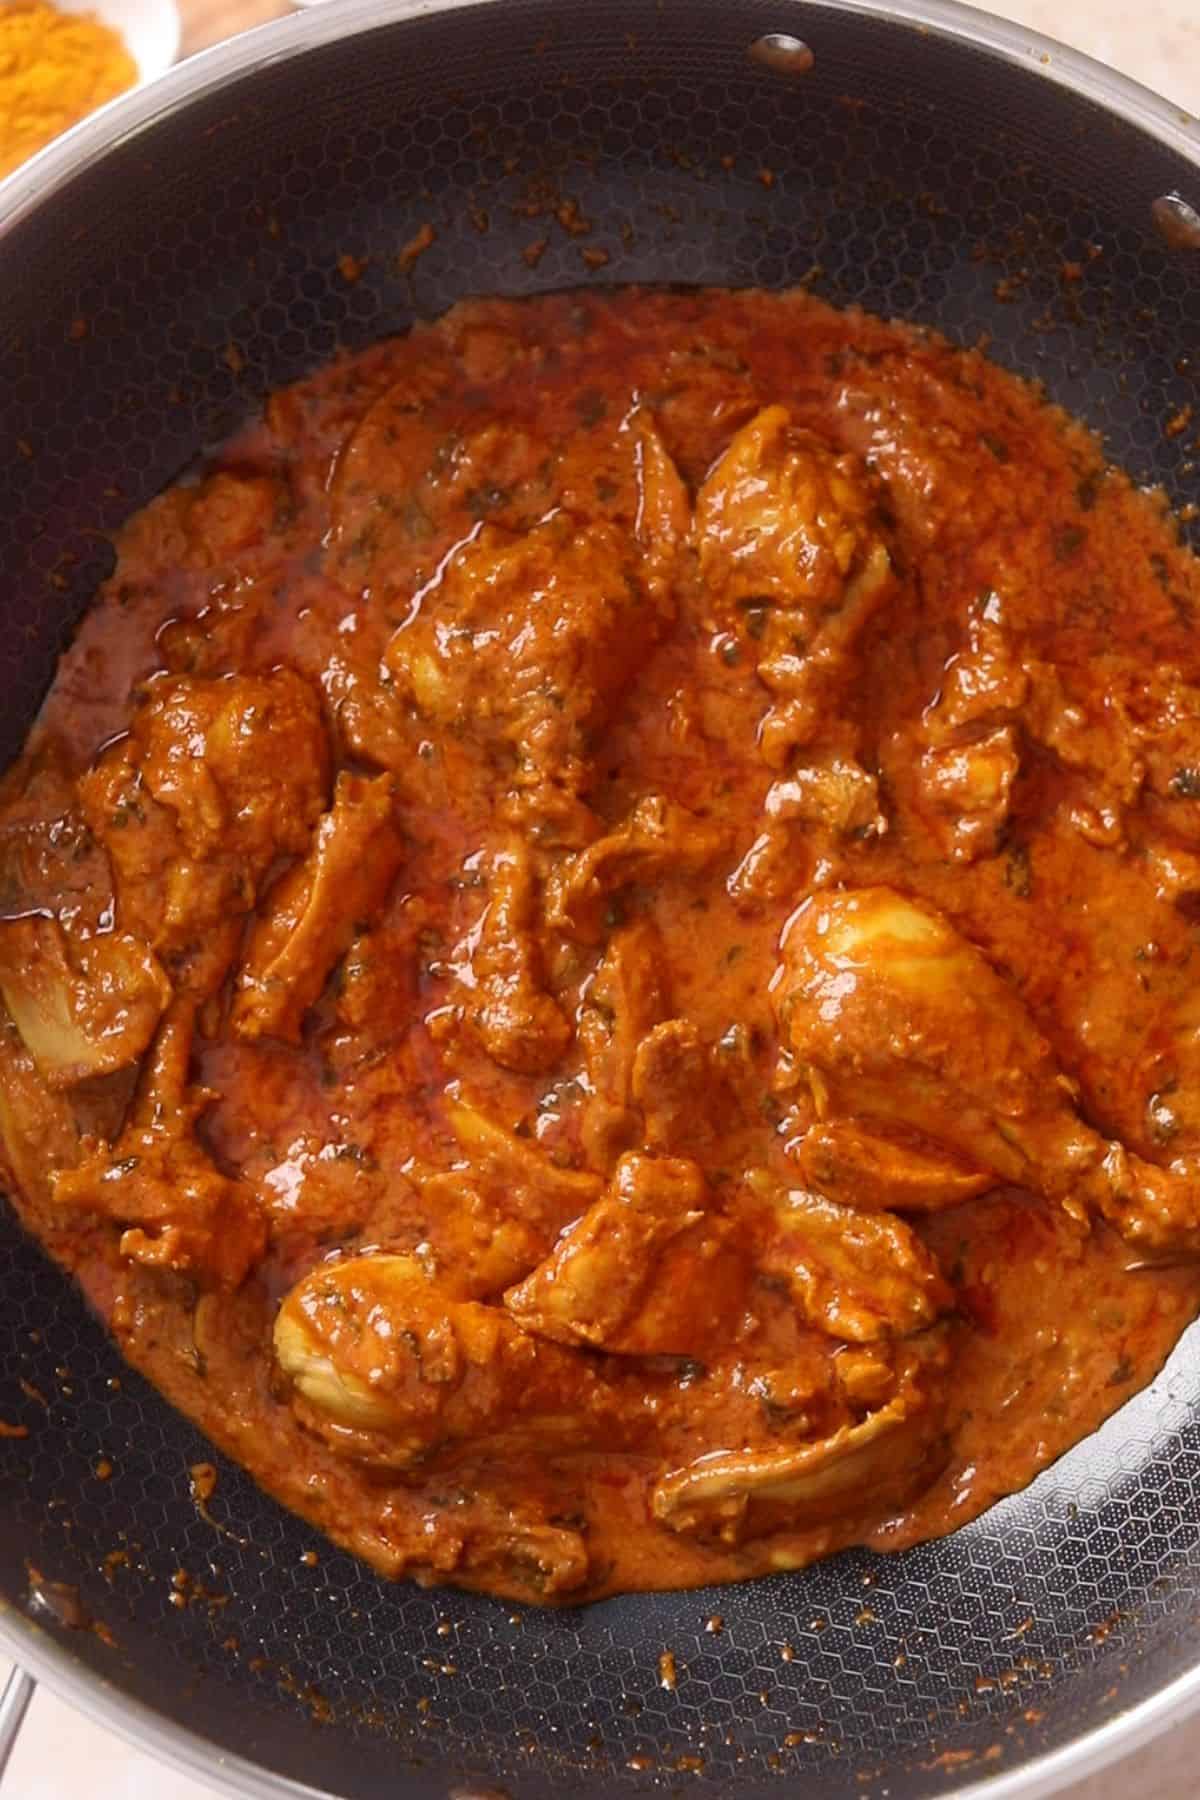
6. On medium heat, cook the chicken for 4-5 minutes while stirring frequently until chicken begins to firm up. Cover for 12-15 minutes to cook through the bone. Once finished cooking, we want the chicken to be almost cooked(98%) and the masala to be thick (but not too dry).
Par Boil The Rice
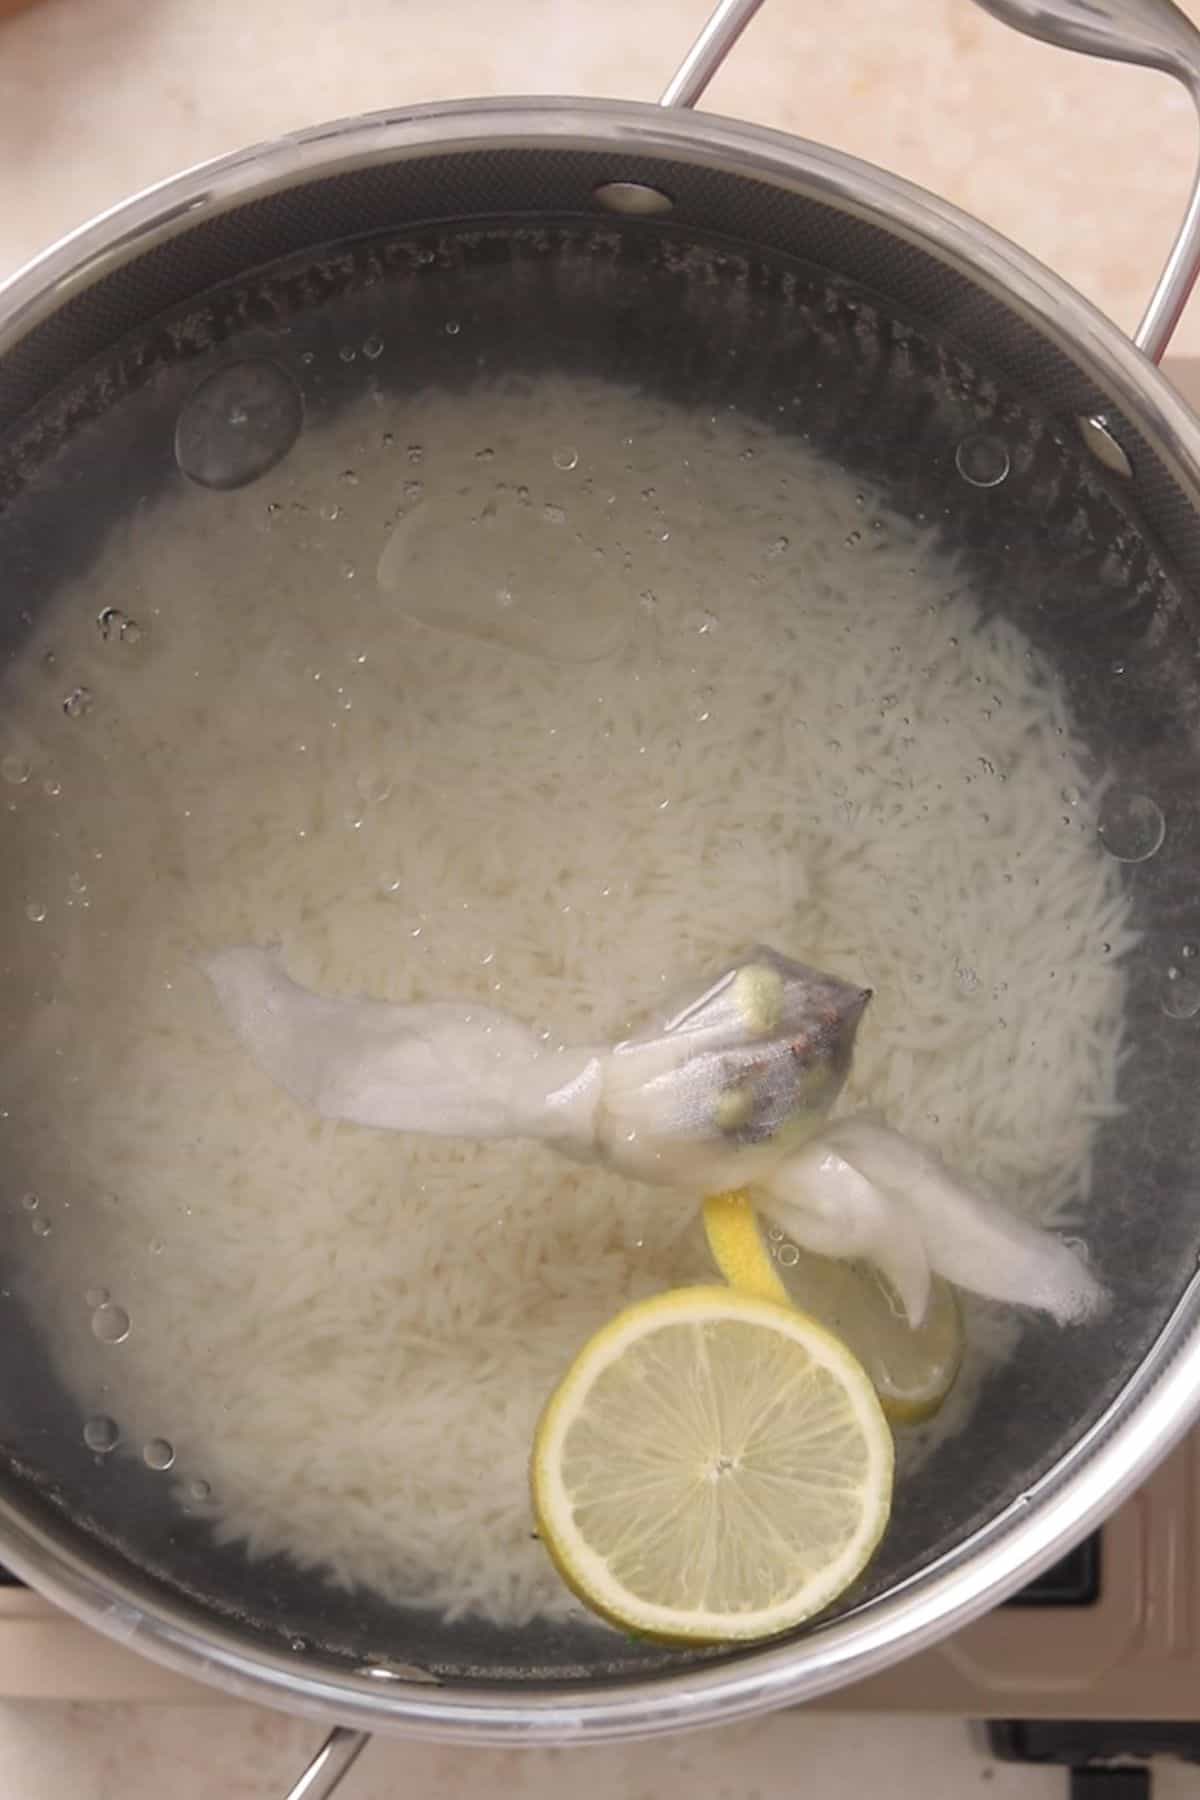
7. Bring a large pot of water with spices and salt added in to boil. Add the soaked rice and gently stir the rice 1-2 times to make sure it doesn't stick to the bottom.
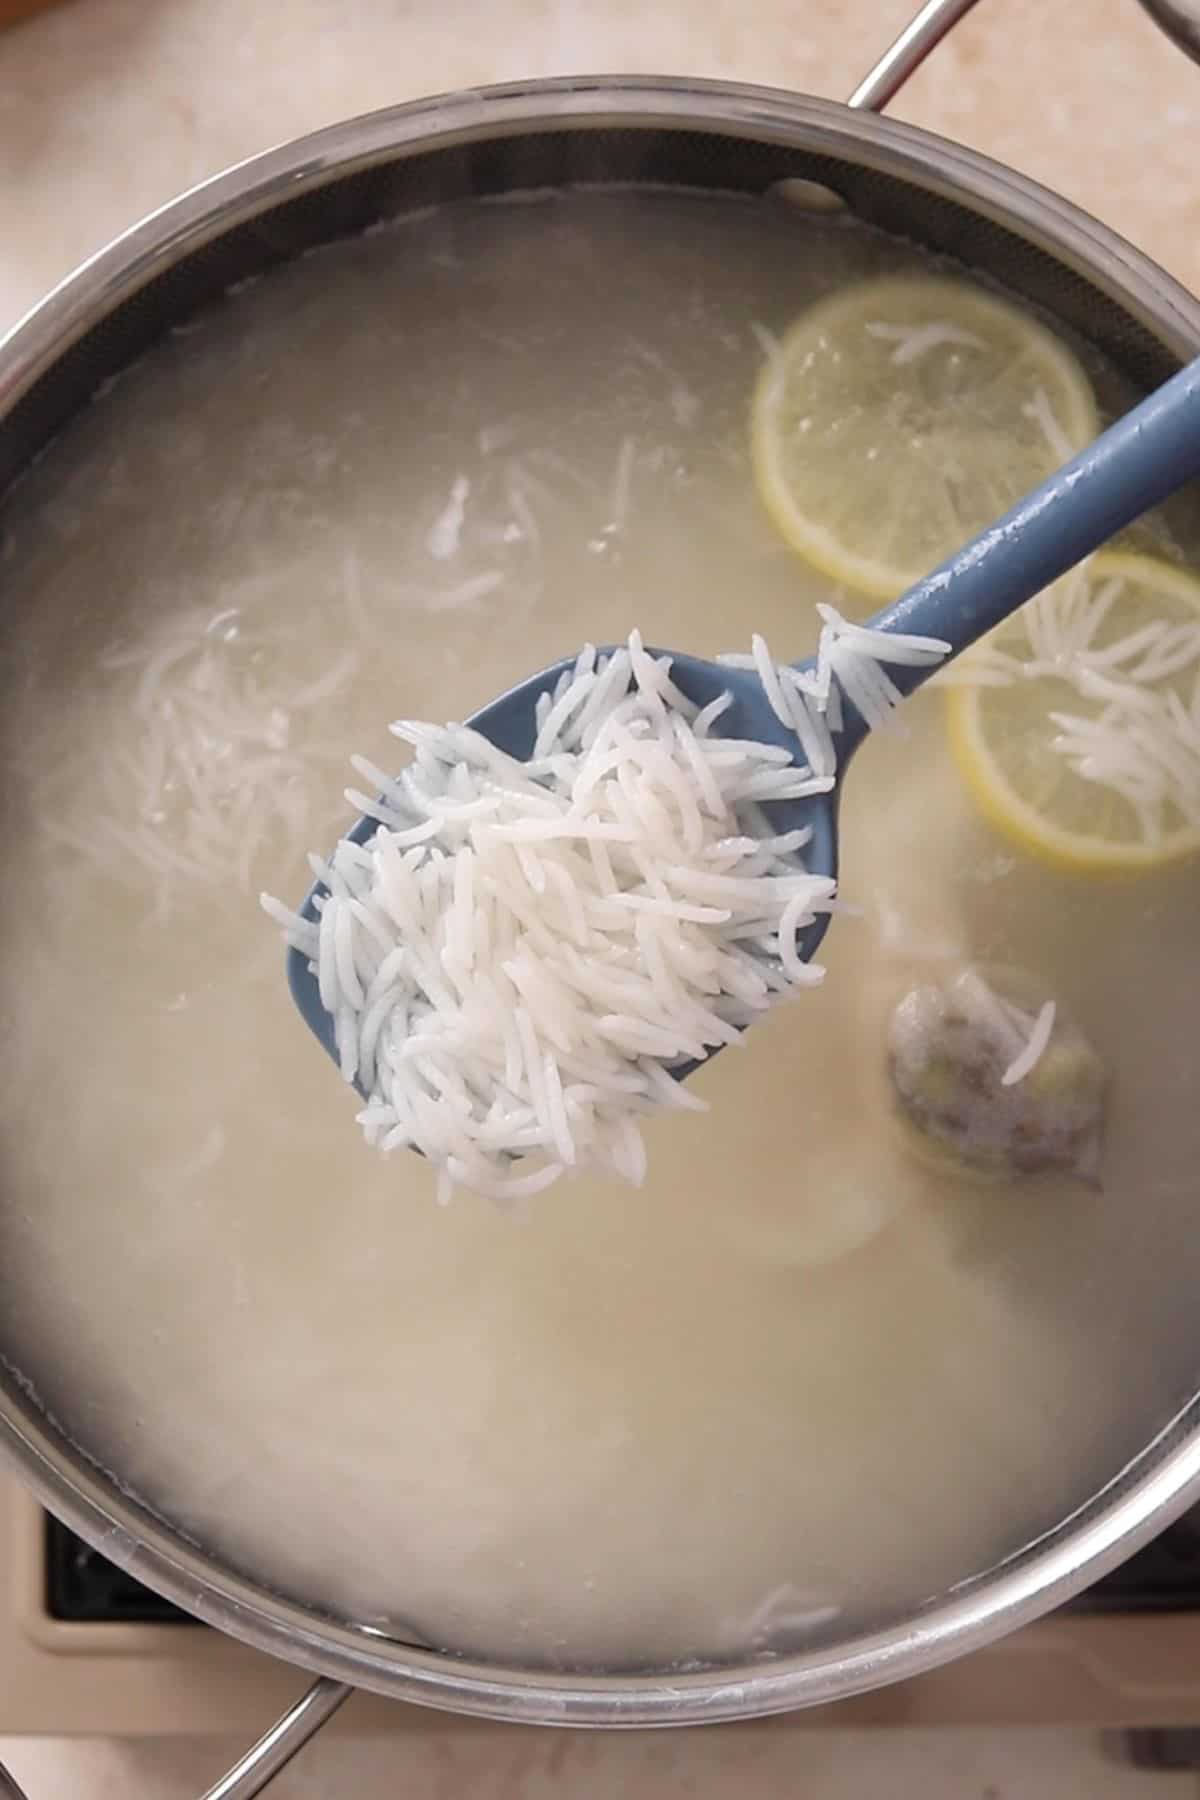
8. Par boil the rice(95% cooked) and drain using a colander. Ideally, this I time this step with chicken masala nearing completion so that we can begin layering while everything is still hot.
Final Assembly (Layering & Dum Cooking Biryani)
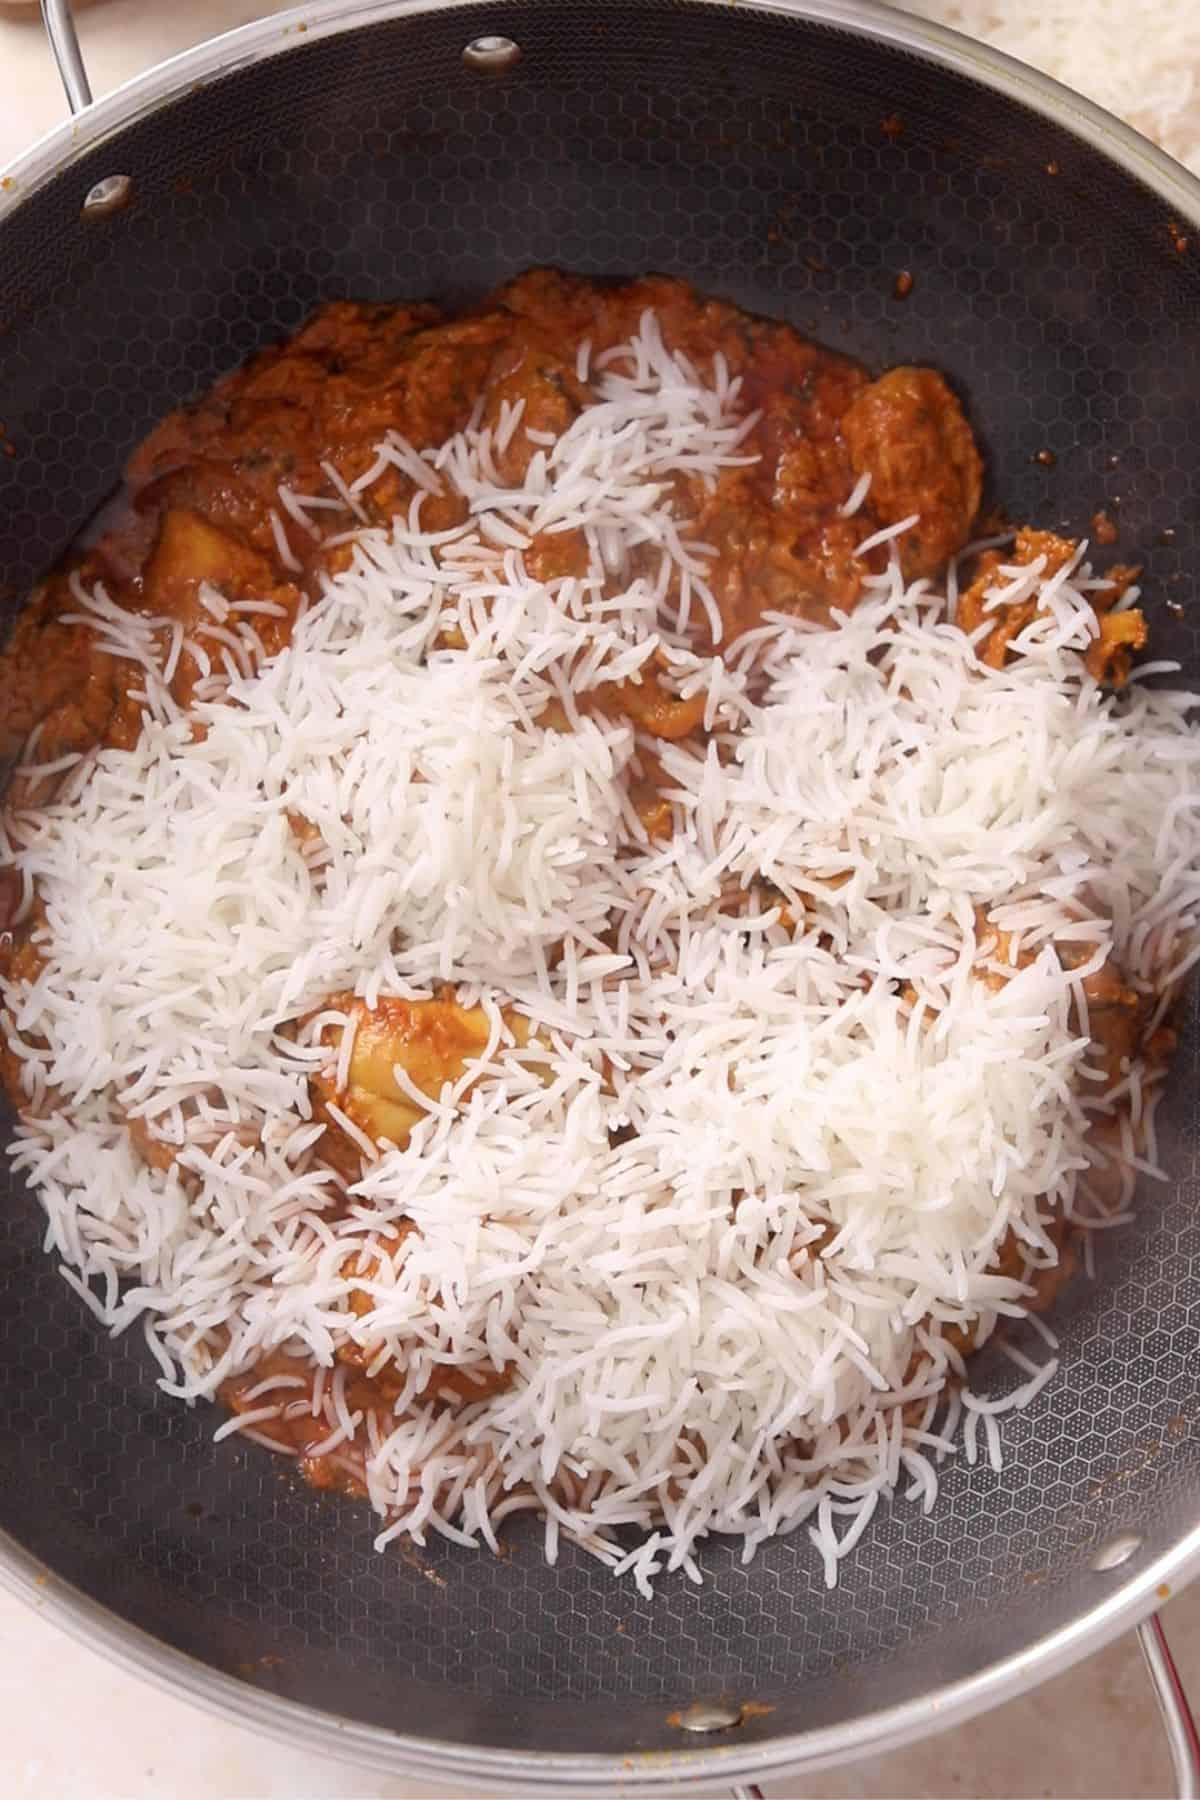
9. Bring everything together for the final steaming (dum cooking). Spread half of the rice on the base of wide pot. Arrange all of the chicken masala evenly over it. Add a thin layer of herbs and fried onions over chicken. Finish with the remaining rice on top.
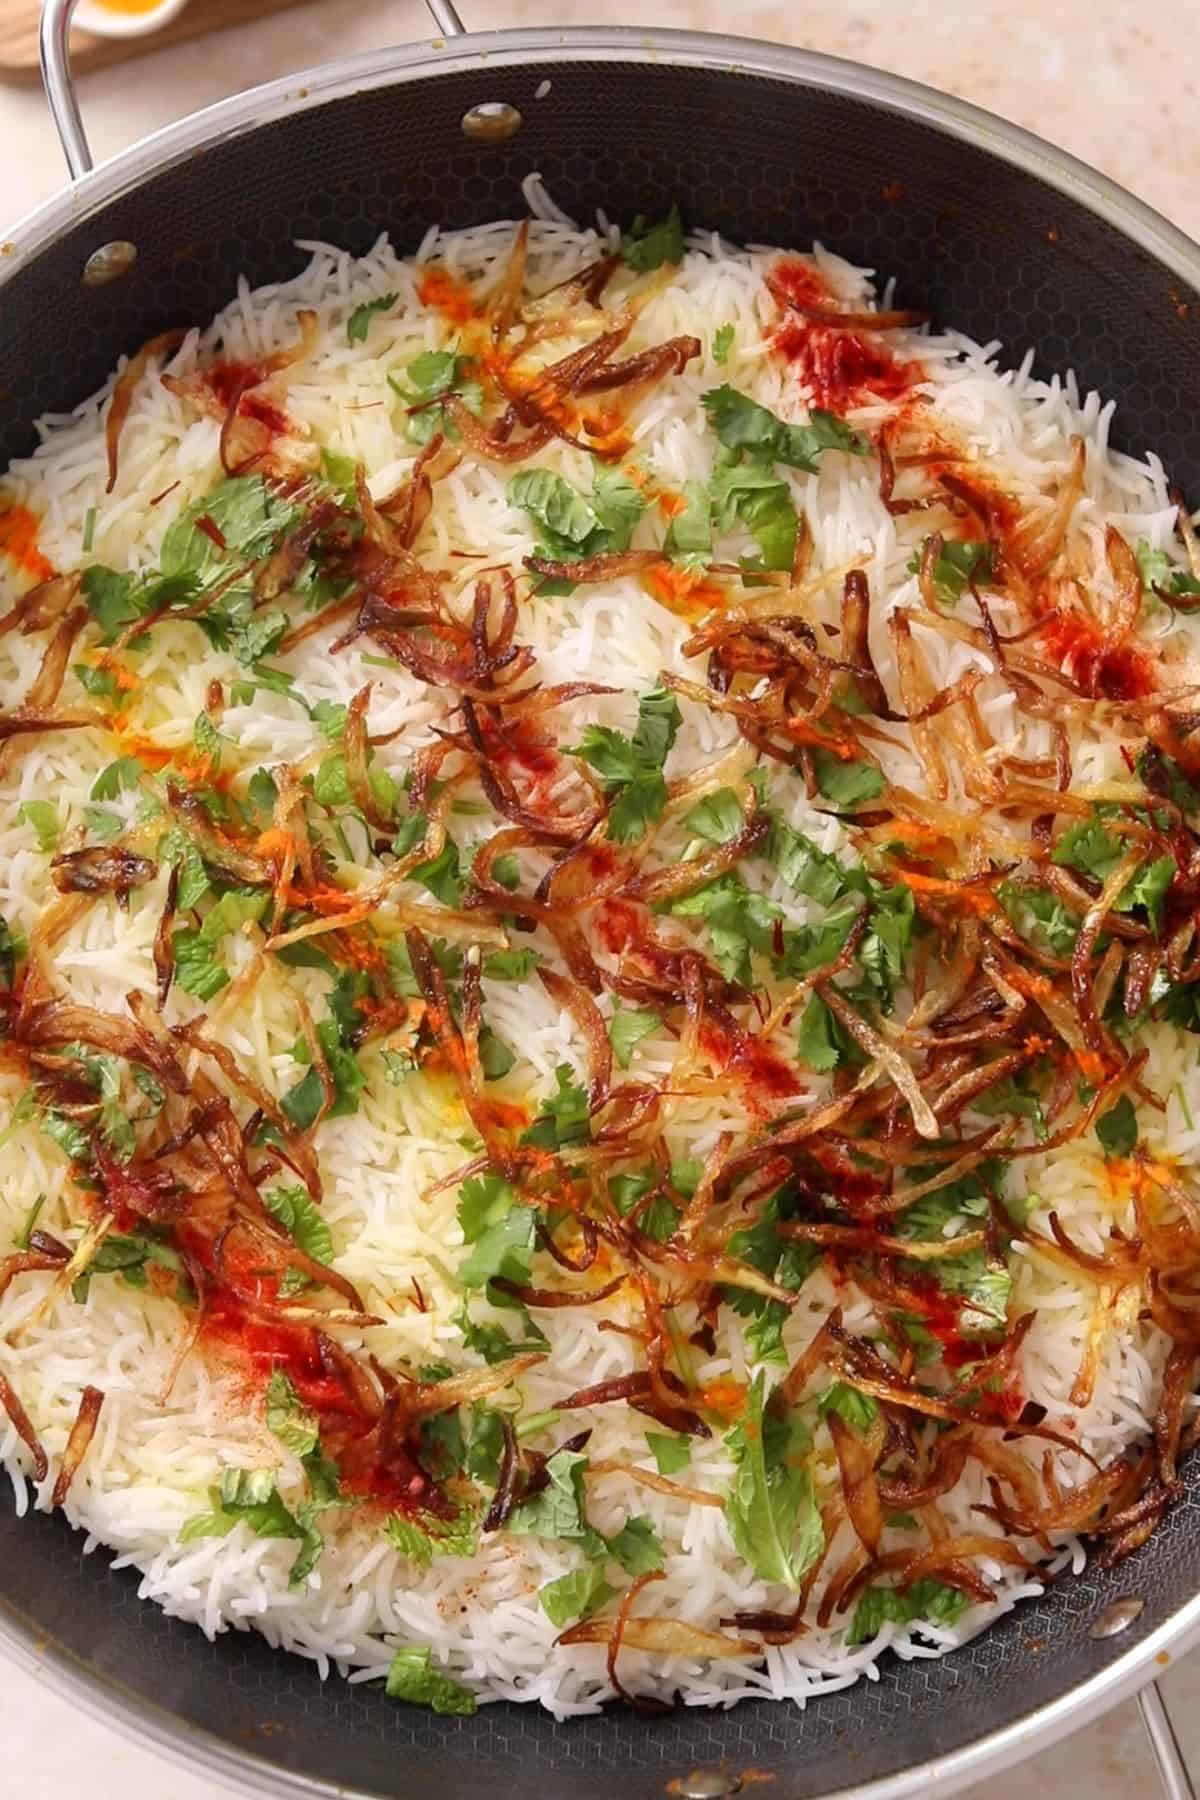
10. Scatter the final garnishes over the top rice layer. Tightly cover the pot and let the biryani steam over low heat. You can do this in oven or indirect heat (read recipe card for detailed instructions).
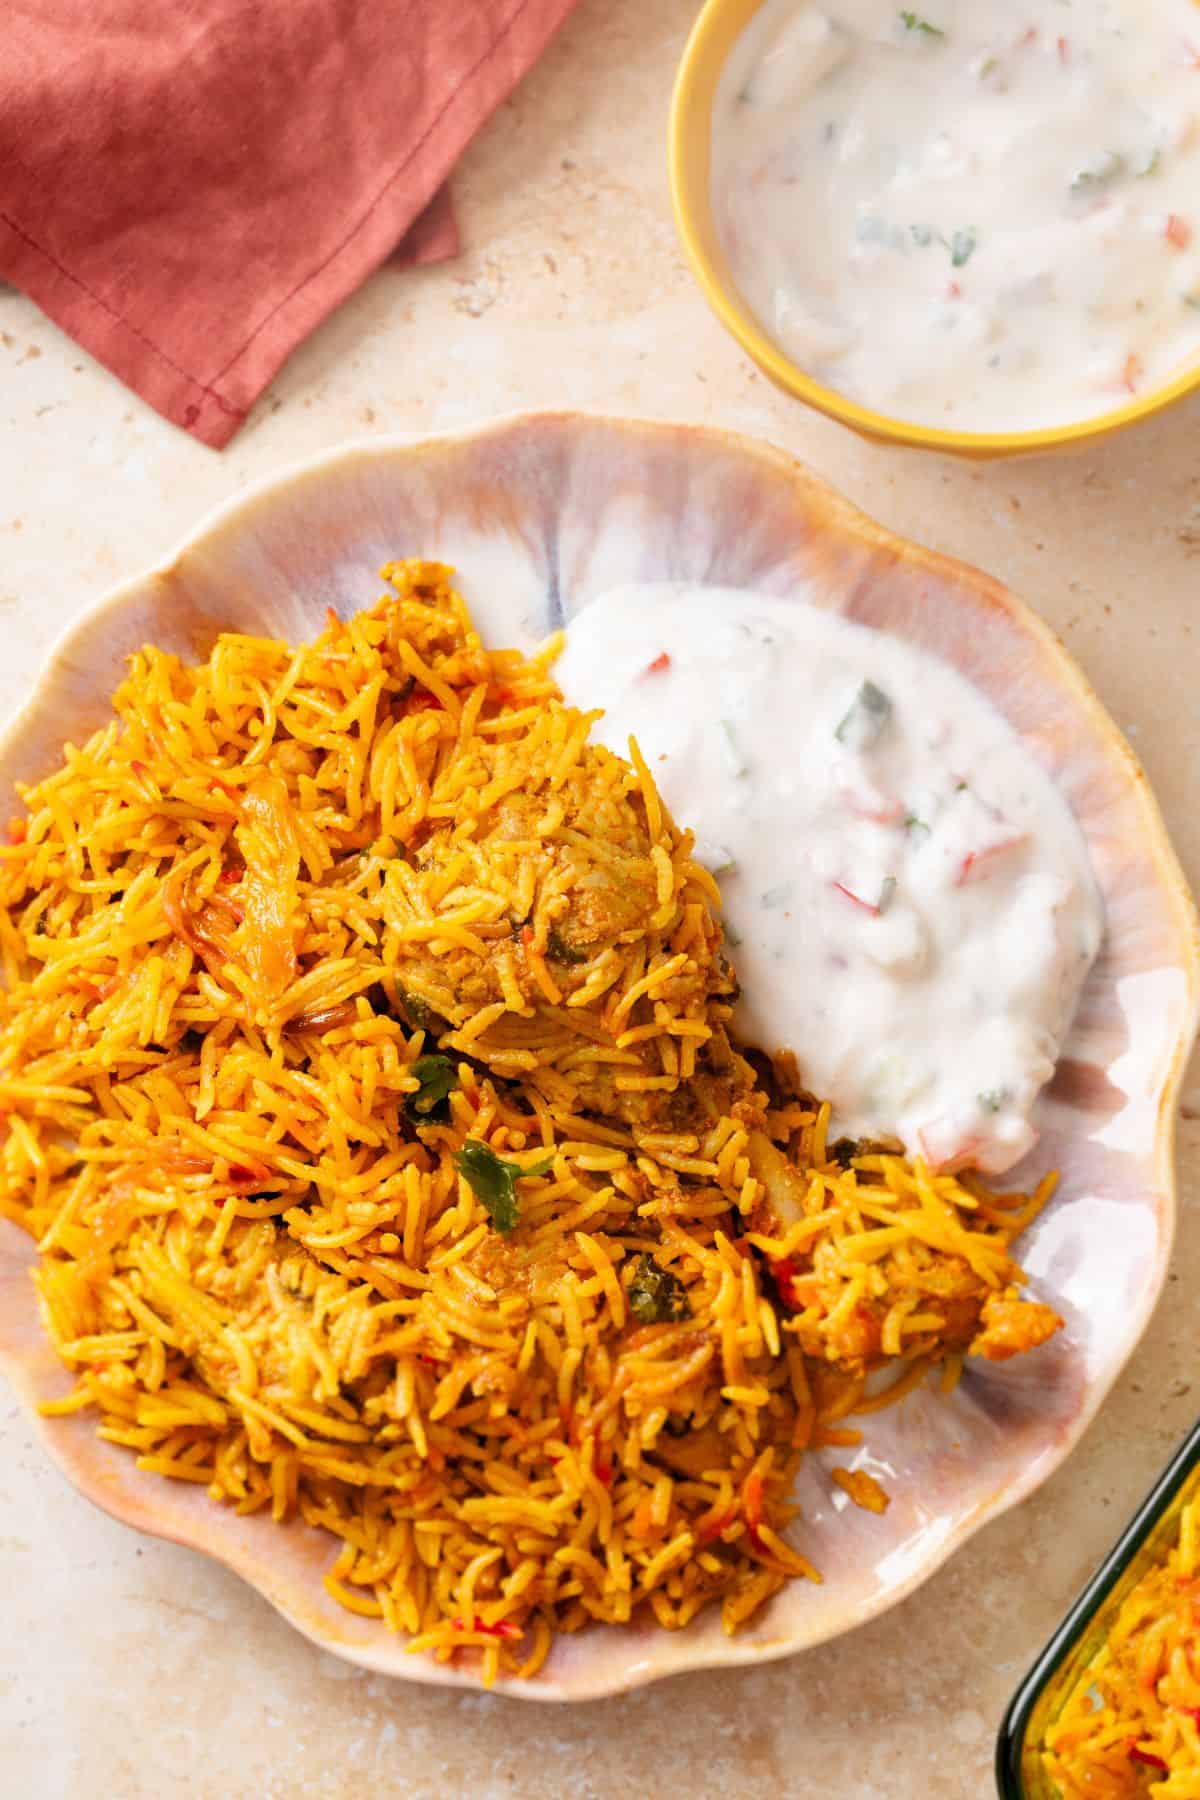
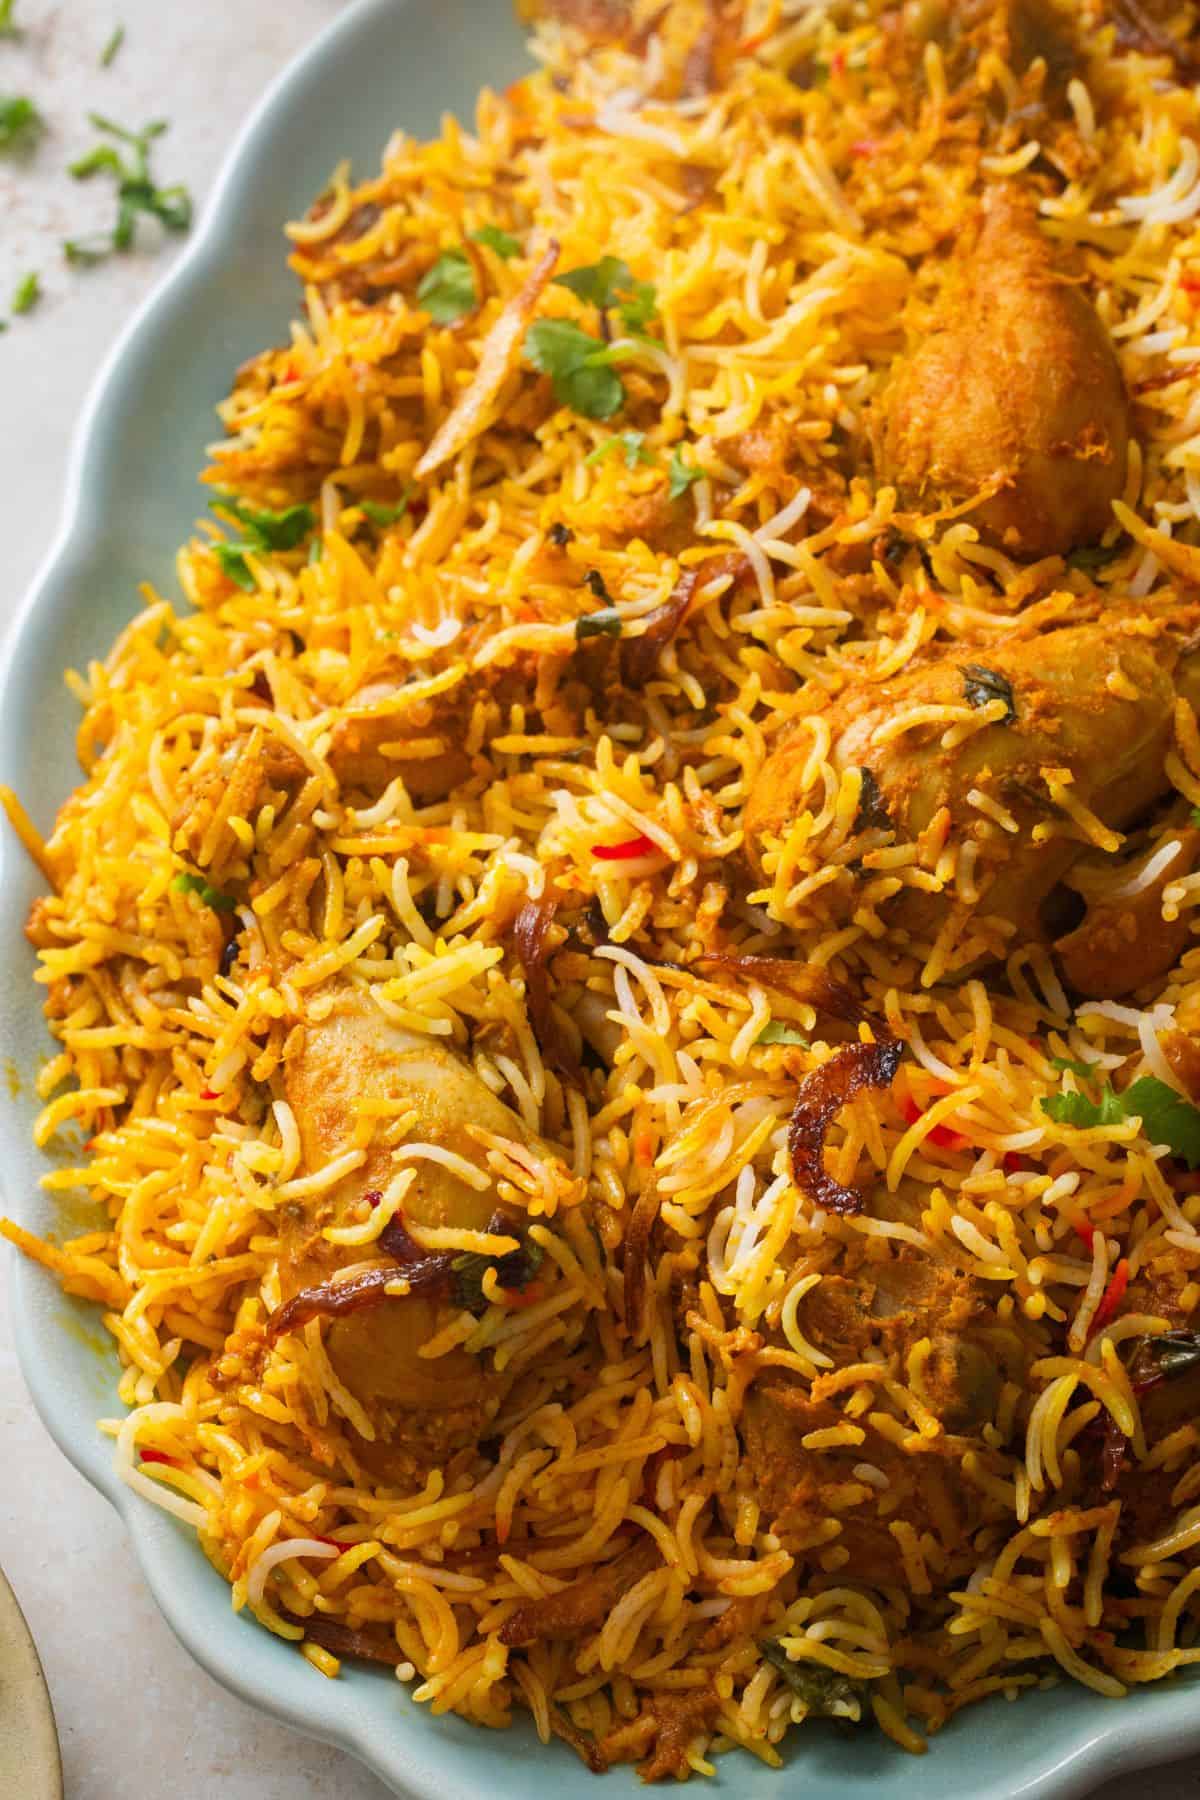
Let the steamed biryani rest for 10-15 minutes for rice to firm up before gently fluffing it from the side of the pot using a soft spatula. Serve (preferably) using a small saucer plate. Using a small plate prevents the rice from breaking. Pair the biryani with sides such as cooling raita, and crunchy kachumber salad.
See my tips and tricks in the recipe card below the instructions

Dum Chicken Biryani With Restaurant Flavors
Ingredients
To Deep Fry Onions
- 400 g sliced onions these will we used both while cooking chicken, as well as while layering the biryani
- 2-3 cup Oil I use avocado oil. choose a neutral high flame point cooking oil since we will also use it later for cooking the chicken
To Marinate Chicken
- 6 large garlic cloves
- 1 inch fresh ginger
- 4-5 green chillies hot! (adjust to taste)
- 500 g chicken drumsticks skinned, choose medium sized
- 500 g chicken thighs skinned,choose medium sized
- 175 g plain yogurt thick yogurt, I use whole yogurt
- 1 to 1.5 tablespoon kashmiri chilli powder
- 1 teaspoon turmeric powder
- 1.5 tablespoon coriander powder
- ½ to 1 tablespoon biryani masala adjust quantity depending on the intensity(taste, heat level & aroma) of the biryani masala you are using. I use mild & aromatic homemade biryani masala
- 1 teaspoon salt
- 1.5 tablespoon lemon juice
- ¼ cup cilantro leaves
- 2 tablespoon mint leaves
- ⅓ cup oil leftover from deep frying onions
Rice
- 400 g rice can go to 500g if you prefer more rice than chicken
- 2 tablespoon oil
- ½ tablespoon lemon juice
- 6 green cardamom pods
- ½ inch cinnamon stick
- 4 cloves
- 1+¼ teaspoon salt adjust to taste, we want well seasoned rice
To Layer The Biryani (adjust the quantity of these components as desired)
- ½ cup fried onions
- 4-5 tablespoon ghee
- 2-3 green chillies
- 1 tablespoon ginger julinnes
- ⅓ cup green herbs chopped fresh mint & fresh cilantro
- 1 teaspoon biryani masala divided
- 12-15 saffron strands soaked in 2 tablespoon warm milk
- 1.5 teaspoon kewra water for aroma, skip if not available
- ¼ teaspoon food color I use mix of orange & egg yellow powdered food color
Instructions
Make Deep Fried Onions
- Start by heating oil in a deep, heavy-bottomed, wide pan over medium heat. Once the oil is ready, add the sliced onions.
- Let them fry, stirring occasionally, so that they cook evenly.This process takes 8-12 minutes and patience. Keep a close eye on them as they begin to turn golden.You are looking for a rich golden (but not dark) color. Take them out on a wide tray or plate before they turn too dark since they will continue to deepen in color due to carryover heat.
- Spread fried onions on a large plate or tray to cool down. As the onions will cool, they will crisp up. Save ⅓ rd of the onions to use while layering. Rest will be used while marinating the chicken.
Marinate the Chicken (At least 5-6 house ahead, preferably)
- Add garlic cloves, ginger and green chillies to a small blender jar and grind into a smooth paste.
- In a large bowl, add the chicken pieces, along with whisked yogurt, ginger garlic green chilli paste, red chili powder, turmeric powder, coriander powder, and salt. Also add ⅔rd of the fried onions along with chopped cilantro and mint leaves. Pour over ⅓ cup of onion flavored oil.
- Mix everything really well with hands(wear gloves!). Make sure that the chicken is evenly coated with the masala. Let marinate for at least 5 to 6 hours.
- Before you begin cooking, take the marinated chicken out of the fridge and let it sit at room temperature for about thirty to forty five minutes. This helps it cook more evenly and keeps the chicken tender.
Wash and Soak Basmati Rice
- Once you are ready to cook biryani, start by rinsing the rice. Measure and place basmati rice in a large bowl. Move around in circular motion and scrub lightly with fingers. Repeat this 3-5 times under a running stream of water until the water runs mostly clear. This helps remove excess starch so that the rice grains stay seperate after cooking.
- Once washed, soak the rice in fresh water for 20-30 minutes. Meanwhile, lets make the chicken masala.
Cook The Chicken Masala Base
- Transfer the marinated chicken to a large heavy bottomed pot. I use a 14 inch pot with lid. We will use the pot to make chicken masala and then layer the biryani in it as well. Make sure the pot is large enough since you will be layering the rice in the same pot later. Sprinkle biryani masala and mix with chicken.
- Cook the chicken over medium heat for 6-8 minutes, while stirring often, until it starts to firm up and you see liquid in the pot. Then cover the pot and let cook for another twelve to fifteen minutes or just until chicken is fully cooked and the masala has thick & saucy. Make sure that the chicken does not start falling off the bone(adjust cooking time as needed).
- Once chicken masala is ready, transfer to a dish and let stand.
- While the chicken is cooking, bring a large pot of water to a boil with salt, oil and all the whole spices.
- Add the soaked and drained basmati rice to boiling water and gently stir once or twice so it does not stick to bottom. Let the rice cook until it is about 95% done, then drain it. When rice is cooked, the grains start floating towards the top of boiling water. Drain all the water and discard the whole spices parcel.
Assembly & Final Steaming
- Now it's time to layer everything. You can create layers of biryani as desired. Ideally chicken masala is parceled between layers of rice. Liberally brush ghee on sides and bottom of the layering pot (I use the same pot in which I cooked the chicken). Spread half of the basmati rice evenly over the base. Sprinkle ½ teaspoon biryani masala on the rice.
- Spread all the chicken masala evenly over rice. Sprinkle half of herbs and 2-3 tablespoons fried onions on chicken. Then top with the remaining rice. Spread rice to cover all the chicken masala.
- Add your final garnishes over the top layer of rice. Which include sprinkle of remaining ½ teaspoon biryani masala, remaining fried onions, slit green chillies and fresh chopped herbs. Generously drizzle remaining ghee, kewra water and saffron milk over rice. Sprinkle food color over the rice.
- Tightly close the lid of the pot. You can seal the pot with aluminium foil or roti dough (traditional way). Place over a low heat and let steam for 15-20 minutes. This process of sealed steaming is called dum cooking. Do not peek or open the lid while steaming.
- Let the steamed biryani rest for 20 minutes for rice to firm up. Once rested, gently fluffing it starting from the side of the pot using a soft spatula. Mixing the biryani creates that traditional look of masala soaked rice, colored rice grains and chicken pieces.
- Serve the biryani (preferably) using a small saucer plate or spatula. Using a small plate prevents the rice from breaking. Always start serving rice from the side of the pot. Serve with raita, and refreshing kachumber or green chutney.
Notes
- Use the best quality aged, long grain rice you can find for making biryani. I use Royal basmati sella rice or Indian gate basmati rice.
- Make sure that the yogurt you are using is not sour else the biryani will become tangy.
- Let leftover biryani cool down and store it in air tight containers for 2-3 days. To reheat, microwave a serving for 20-25 seconds.
I'd Love to Hear from You!