

Paratha are griddle fried layered indian flatbreads made with whole wheat flour. These delicious unleavened flatbreads are very easy to make at home. You can pair them with any main dishes, or enjoy with condiments. They are amazing for making wraps. In this post, I am sharing my paratha recipe with ton of pictures to help you make soft & flaky parathas at home.

Save The Recipe!
Growing up, paratha was a lunchbox staple with a sukhi sabzi(spiced vegetables). Every time I opened my lunch, I was welcomed by the aroma of ghee that mom liberally used while toasting parathas to keep them soft till its time of eat. These traditional flatbreads are a staple in north india and served for any meal of day - be it breakfast, lunch, tiffins or dinner.
Jump to:
Difference between Roti, Naan & Paratha
I thought of including this section for my non indian readers to help them know a little more about wonderful Indian flatbreads.
Both roti and paratha are unleavened indian flatbreads made simply with a dough of atta (whole wheat flour) and water. Roti is made by rolling the dough into thin circular shape and then its simply cooked to puffy perfection without using oil or ghee. Rotis can either be cooked on the griddle or directly over the stove flame. Ghee is smeared on cooked warm rotis before serving to make them taste extra delicious. You can see my roti recipe here.
When making parathas, the dough is layered on to itself a few times and then rolled into a triangle, square or circular shape on a lightly floured surface. The rolled dough is then toasted on a hot tawa (griddle) brushing some ghee or oil on both sides. In this process the multiple layers trap steam and result in a flaky paratha. While toasting, both the sides of paratha turn crispy and get golden brown spots. The longer you cook and press, the crispier the paratha gets.Parathas are plain or stuffed liked these ones made with paneer stuffing.
Traditional Naan is a leavened bread traditionally made using maida (all purpose flour), yeast, salt and water. Authentic naan is cooked in hot tandoor (large clay ovens) until puffy charred spots appear. But as usual, there are many variations. Here is my no yeast naan recipe cooked on stove top.

How To Make Plain Paratha (Step By Step Photos)
Which flour is best for Making Paratha?
Parathas are made with atta which is fine milled whole wheat flour. You can easily find atta at indian or pakistani grocery stores or online. Atta is different from whole wheat flour available in the baking aisle.
You can also use maida for making parathas using this recipe. Parathas made with maida are more tender and flaky than the atta ones. I suggest buying maida from indian or pakistani stores to make parathas. That said, you don't have to rush to store, make use of whichever flour you have handy at home to make these delicious flatbreads.

Make The Paratha Dough
Equipment You Will Need For Kneading the dough - Large mixing bowl or a wide shallow dish (called paraat in hindi).

- Measure and add dry atta to the bowl. Slowly start adding water and mixing it in the atta using circular motion of your fingers.
- Once about 80% of the atta is wet, start kneading gently. Atta will start clumping up as it absorbs water. At this stage add water in very small quantities. In about 2 minutes or so you will see that all the atta will be moistened and it will clump into a ball. Make sure that the atta is not hard by squeezing it between your palms as if making a fist. It should not feel dry.
- Use your knuckles next to knead the atta. Flatten out the dough ball and pull it together towards yourself using your palms.Flatten again using knuckles. Repeat this kneading process for 5 to 7 minutes. If you feel at any point that the atta is dryish, add a tiny splash of water.
- For the last 1-2 minutes of kneading, use both your hands to knead to a smooth & pliable dough. Kneading with both hands will really work up the gluten. You can add a little oil or melted ghee at this point.
- Cover the dough with a kitchen towel for about 20 minutes. If you plan on making parathas later, refrigerate the dough in an air tight container.

Note :- I just find it easier with hands but you can use your food processor fitted with dough blade or stand mixer to make the paratha dough. The steps pretty much remain the same- add flour & slowly add water, pulse, let water get absorbed, then pulse again. Let run on low for 2-3 minutes and make a soft & pliable dough.
Why its important to rest the dough?
Resting the paratha dough after kneading allows the straches in flour to absorb water fully. While resting, the water that we add while kneading redistributes among the starches in the atta. Due to absorption, gluten in flour relaxes and expands which will make it easier for us to roll the paratha later. Ever wondered why its difficult to roll or why flatbread keeps shrinking(especially when its made with all purpose flour) when you roll the dough right after kneading? This is the reason. Rested dough is easier to handle. However dont rest the paratha dough for more than 20-30 minutes else the the dough might get sticky.
Rolling Square Parathas
Equipment You Will Need - A flat and firm rolling surface and rolling pin. You will also need about a cup or so of dry atta in a plate.
If you refrigerated the paratha dough, take it out 10-15 minutes prior to rolling and let sit on kitchen counter.

- Divide the rested dough into equal portions. Take each dough portion in between your palms and roll to make smooth balls. Flatten the balls slightly. Keep the rest of the dough balls covered while you roll one by one.
- Place the dough ball on the rolling surface, dust in dry atta on both sides to make sure that the ball in not sticky.
- Using a rolling pin, roll into a rough 4 inch circle. Don't roll in too thin. You can use little bit dry atta as and when needed.
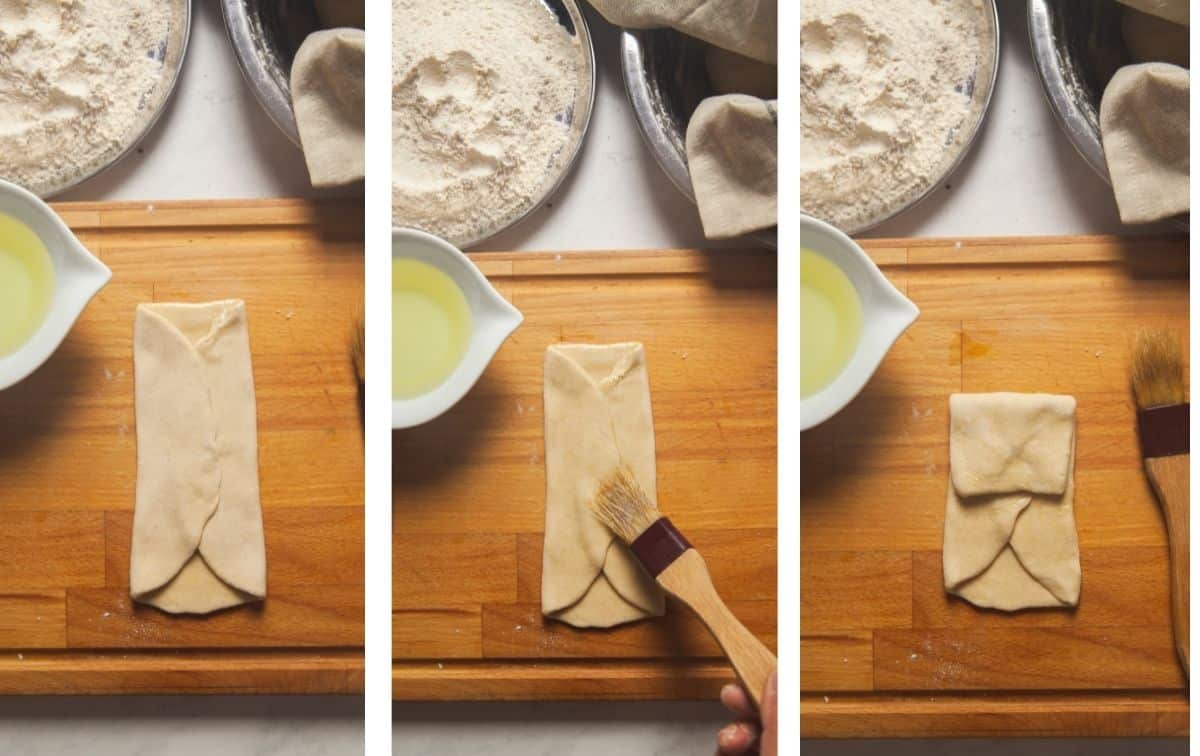
- Brush melted ghee or oil on the circular dough. Fold left ⅓ rd and bring it to the center of the circle. Repeat with the ⅓ rd right side. You will form an elongated rectangle with the dough(having round edges).
- Lightly brush oil or ghee again on folded layers and bring the bottom ⅓ rd to the center of the elongated dough. Bring the top ⅓rd part as well to the middle. You will have a square shape dough.
- Now dip in dry flour and roll back and forth rotating (as needed to keep the square shape into a square paratha.

Rolling Triangle Paratha

- Dust the dough ball in dry flour and place on the rolling surface. Flatten a little bit.
- Using a rolling pin, roll the dough ball into a 5 inch circle.
- Drizzle or brush oil or ghee on top face of the rolled dough. Spread the ghee evenly.
- Make a semi circle by folding one half of the dough over other. Lightly brush the semi circle dough with oil or ghee on one side.
- Fold the semi circle again to make a triangle shaped dough. Dust in dry flour and using a rolling pin, roll back and forth rotating & moving (as needed to maintain the triangle shape) into a triangle shaped paratha.

Toasting
Equipment You Will Need - Tawa, cast iron griddle or fry pan. A flipping/turning spatula.

- Heat up a griddle on low medium heat. To check if its hot enough, sprinkle a pinch of dry flour, if it turns dark brown immediately, the griddle is hot.
- Carefully lift the paratha from the rolling surface (flour your palms if needed) and place on the hot griddle.
- After few seconds you will see that the top pf paratha changes will puff up slightly in places.
- Flip the paratha using spatula and let cook on other side. The second side will cook faster than the first. Brush the top side with melted ghee or oil. Flip and brush oil on the other side. Let the bottom side get golden brown spots before flipping to cook on second side.
- Let the paratha cook on each side till you see golden brown spots appearing. Don't flip again and again. You can cook for a little longer for crispier paratha.
Tip :- Once you take off the cooked paratha from the griddle, place in on a wire rack to prevent it from getting soggy.
My Tips To Make a Soft & Flaky Paratha
- Make a smooth & pliable dough. If the dough is soft, paratha will be soft.
- Let the dough come to room temperature if you refrigerated it before making parathas with it.
- Dont roll the paratha too thin. Avoid applying a lot of pressure while rolling.
- Dont place the un-cooked paratha on a warm or a super hot tawa. Cook the paratha on a medium flame.
- Dont press the paratha too much while toasting. The more you press the layers stick to each other(the paratha will not be flaky). Also paratha gets crispier.
- Dont skimp on oil while cooking parathas. They taste dry. .
- If you plan to make paratha for travel or for eating 6-8 hours later, you can knead the dough using milk. It helps in keeping paratha soft.
- Another tip if you want to consume parathas after 6-8 hours or next day is to not crisp them a lot while cooking. When toasting, just when paratha gets few brown spots on each side, take it off the stove, cool, stack and store them.

Variations
- Namak Mirch Ka Paratha - Add red chilli powder and pinch of turmeric to the dough.
- Ajwain Paratha - Add ½ teaspoon ajwain and ¼ teaspoon cumin seeds and salt to the dough.
- Pudina Paratha - Add fresh and dried mint leaves to the dough. See my pudina paratha recipe here.
- Methi Ka Paratha- You can add 1 teaspoon crushed dried kasuri methi to the dough.
- Make Vegan Paratha - Simply use oil instead of ghee.
Storage
Store the cooled parathas refrigerated with wax paper in between them in an air tight container for 2 days. you can easily freeze the parathas the same way. Stack them with parchment paper in between and place them in a ziplock bag and freeze.
Reheat the paratha for 2 minutes or so on a heated tawa or microwave for 30 seconds or so and serve. You dont need to thaw.

Plain Paratha Recipe
Equipment
- Large Bowl
- Rolling Surface & Rolling Pin
- Tongs
- Tawa Or Griddle
Ingredients
- 2.5 cup atta
- 1 cup to 1.25 cup water as needed to make soft dough
- 4-5 tablespoon oil or ghee for toasting paratha
- ¾ cup dry atta for dusting
Optional Ingredients
- ¼ teaspoon salt you can add to dough if desired
- 2 teaspoon oil or ghee you can add to dough if desired
Instructions
Make Paratha Dough
- Measure and add dry atta to a large bowl.
- Slowly start adding water and mixing it in the flour using circular motion of your fingers. As it absorbs water atta will start clumping up. At this stage add water in very small quantities to make a non sticky dough ball.
- Use your knuckles to knead the atta to soft, smooth & pliable dough.If you want you can add a little oil or melted ghee while kneading. The paratha dough should not have cracks at the end of kneading.
- Cover the dough with a kitchen towel for about 20 minutes (to rest the gluten).You can rub with little ghee or oil all over the dough before resting. If you plan on making parathas later, your refrigerate the dough in an air tight container for later use.
How to Make Paratha
- Divide the rested dough into 8 equal portions.
- Take each dough portion in between your palms and roll to make smooth balls. Flatten the balls slightly. Keep the rest of the dough balls covered while you roll one by one.
- Lightly flour the rolling surface and the rolling pin. Dip one dough ball on both sides in dry atta and dust off the excess.
- Place the dough ball on the rolling surface, flatten a little and using a rolling pin, roll the dough into a rough 4 inch circle. Don't roll in too thin and dont apply a lot of pressure while rolling. You can use dry atta as and when needed.
Make Square Paratha (See Step Wise Photos in the article)
- Brush melted ghee or oil on the circular dough. Fold left ⅓ rd and bring it to the center of the circle. Repeat with the ⅓ rd right side. You will form an elongated rectangle with the dough(having round edges).
- Lightly brush oil or ghee again on folded layers and bring the bottom ⅓ rd to the center of the elongated dough. Bring the top ⅓rd part as well to the middle. You will see that a square shape will form.
- Now dip the square shaped dough in dry flour and roll back and forth rotating (as needed to keep the square shape ), roll into a square paratha.
- Proceed to toasting the paratha (instruction below).
Make Triangle Paratha (See Step Wise Photos in the article)
- Heat up a griddle on low medium heat. To check if its hot enough, sprinkle a pinch of dry flour, if it turns dark brown, the griddle is hot.
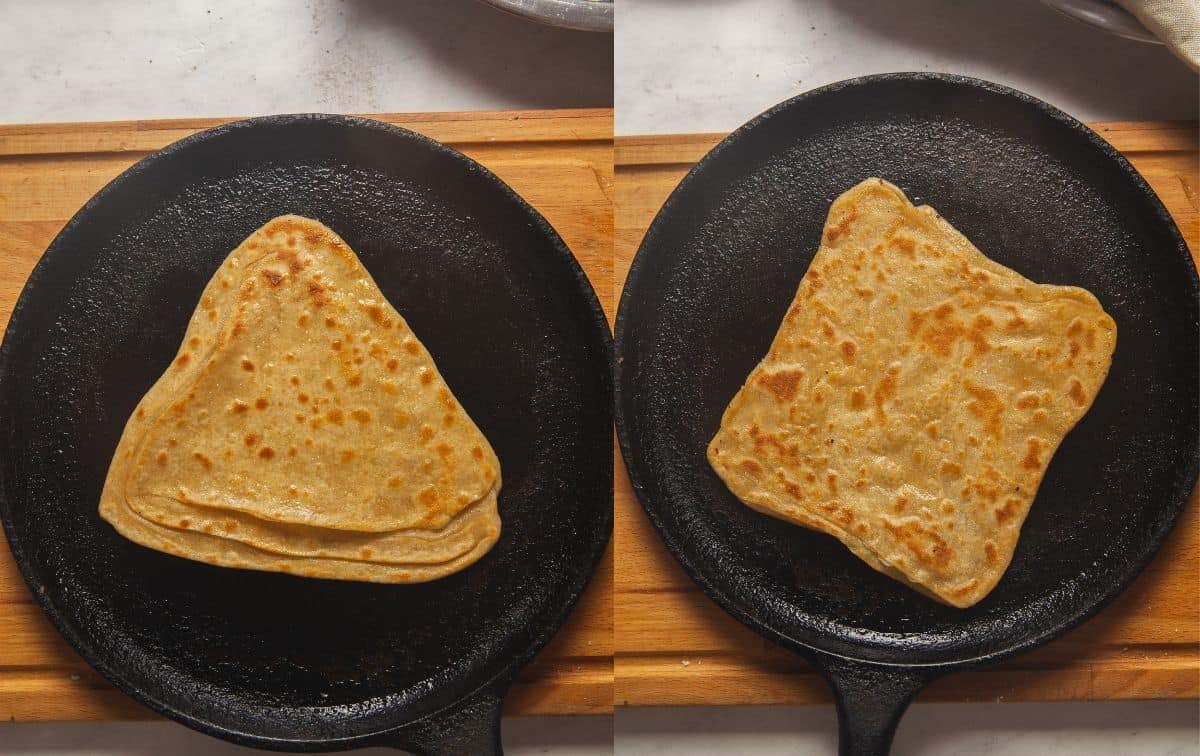
- Place rolled paratha on the hot griddle. After about 30 to 45 seconds you will see that the top pf paratha appears slightly puffy & beige color.
- Flip the paratha using spatula and let cook for 20 seconds on bottom side. The second side will cook faster than the first. Meanwhile,brush the top side with ½ tablespoon to 1 tablespoon of melted ghee or oil. Let cook for 25-30 seconds before flipping. Flip with spatula and brush oil on the other side as well.
- Let the paratha cook on each side for at least 25 to 30 seconds till you see golden brown spots. Don't flip again and again. You can cook for a for about 45 seconds for crispier paratha.
- Remove the paratha and place it in a wired rack for a few minutes to cool down.
- Once a little cool, you can place in in a container lined with paper towel or kitchen cloth.
- Repeat the process for the rest of the dough portions and make all the parathas.
- You can store them stacked and serve warm.
Variation You Can Try
- Namak Mirch Ka Paratha - Add red chilli powder and pinch of turmeric to the dough. Ajwain Paratha - Add ½ teaspoon ajwain and ¼ teaspoon cumin seeds and salt to the dough. Methi Ka Paratha- You can add 1 teaspoon crushed dried kasuri methi to the dough. Make Vegan Paratha - Simply use oil instead of ghee.
Notes
- You can make 10 parathas from the given quantity of dough if you like them smaller and thinner. My family likes slightly thick paratha.
- Make a smooth & pliable dough. If the dough is soft, paratha will be soft. DOnt skip on resting the dough.
- Let the dough come to room temperature if you refrigerated it before making parathas with it.
- Dont roll the paratha too thin. Avoid applying a lot of pressure while rolling else layers will stick to each other and paratha wont be flaky.
- Dont skimp on oil while cooking parathas. They taste dry.
- Dont place the un-cooked paratha on a warm or a super hot tawa. Cook the paratha on a medium flame.
- Dont press the paratha too much while toasting. The more you press the layers stick to each other(the paratha will not be flaky). Also paratha gets crispier.
- If you plan to make paratha for travel or for eating 6-7 hours later, you can knead the dough using milk. It helps in keep paratha soft.
- Another tip if you want to consume parathas after 6-7 hours or next day is to not crisp them a lot. When toasting, just when paratha gets few brown spots on each side, take it off the stove.


foodiewe says
Loved this recipe and the way you explained everything step by step!
Tanvi Srivastava says
Thank you!