

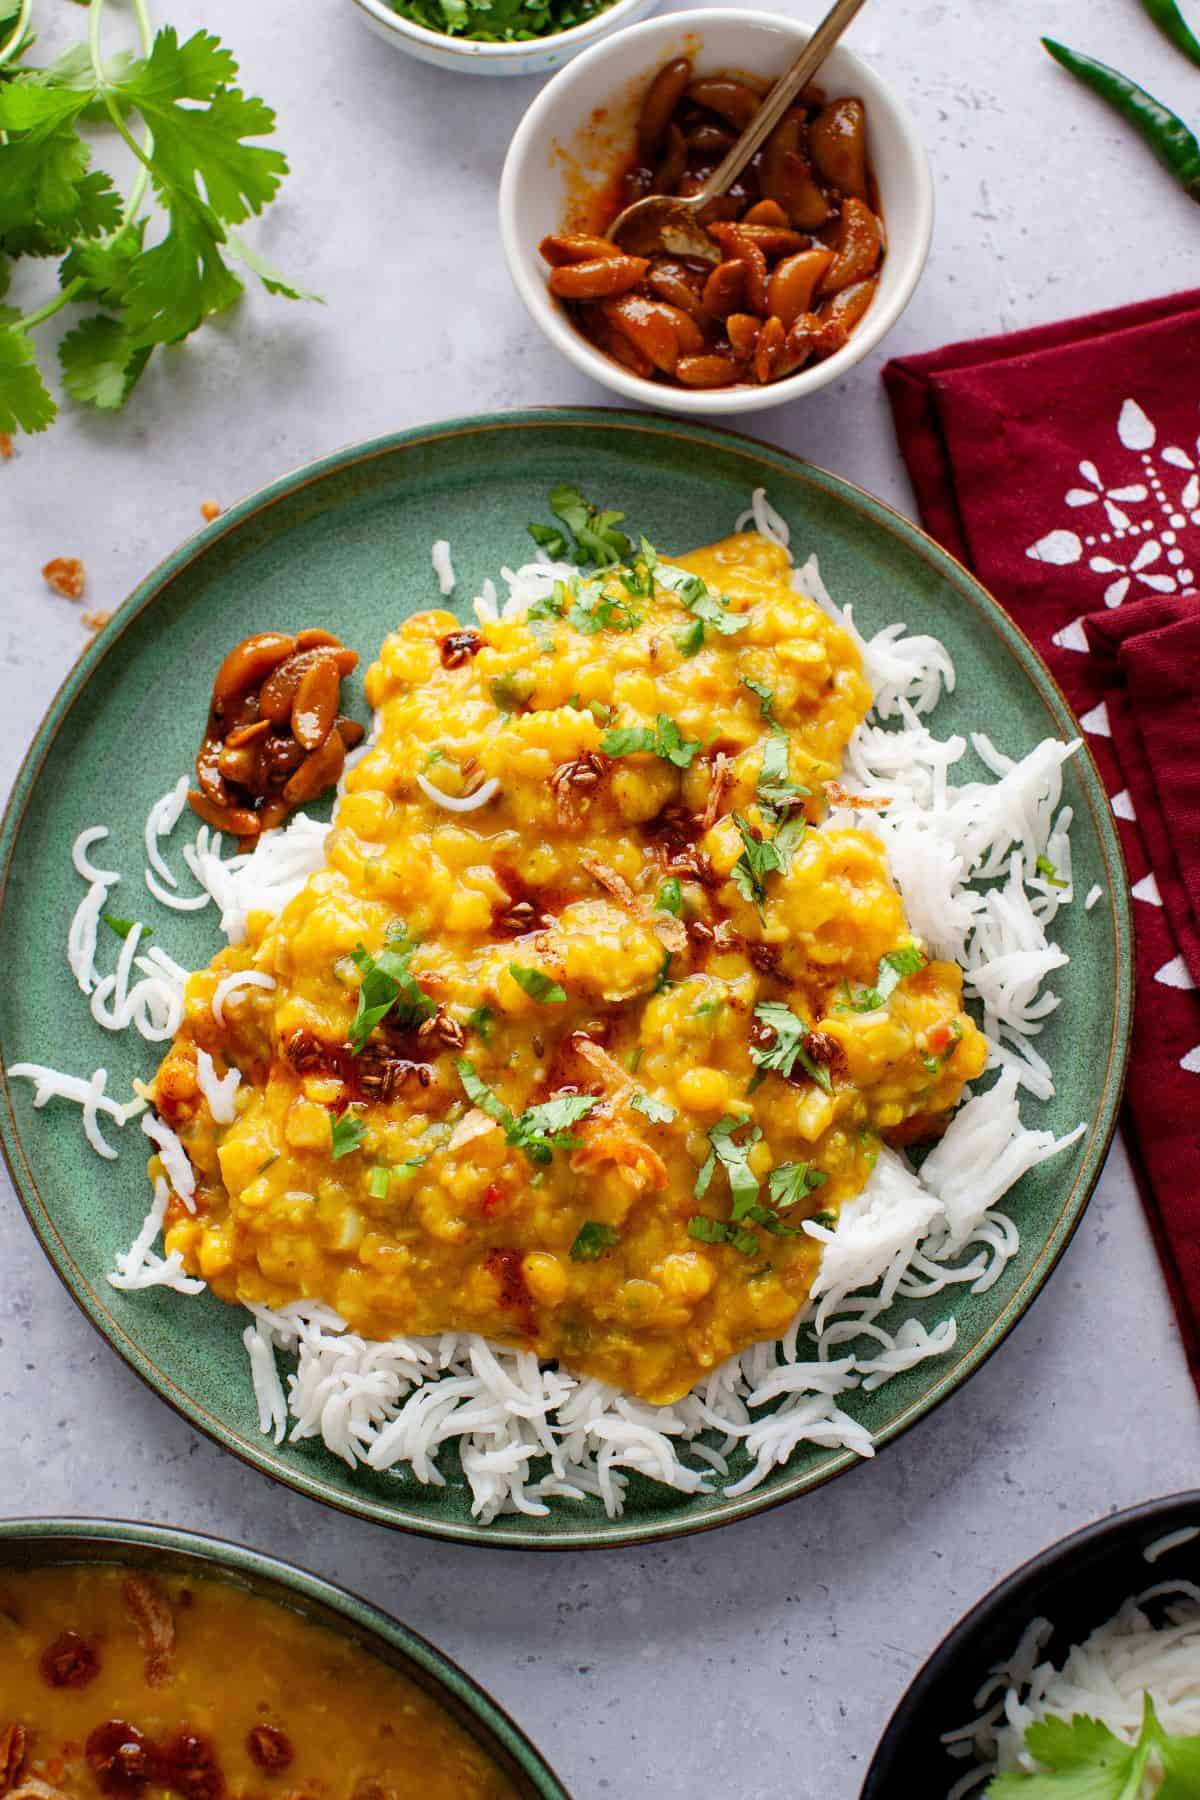
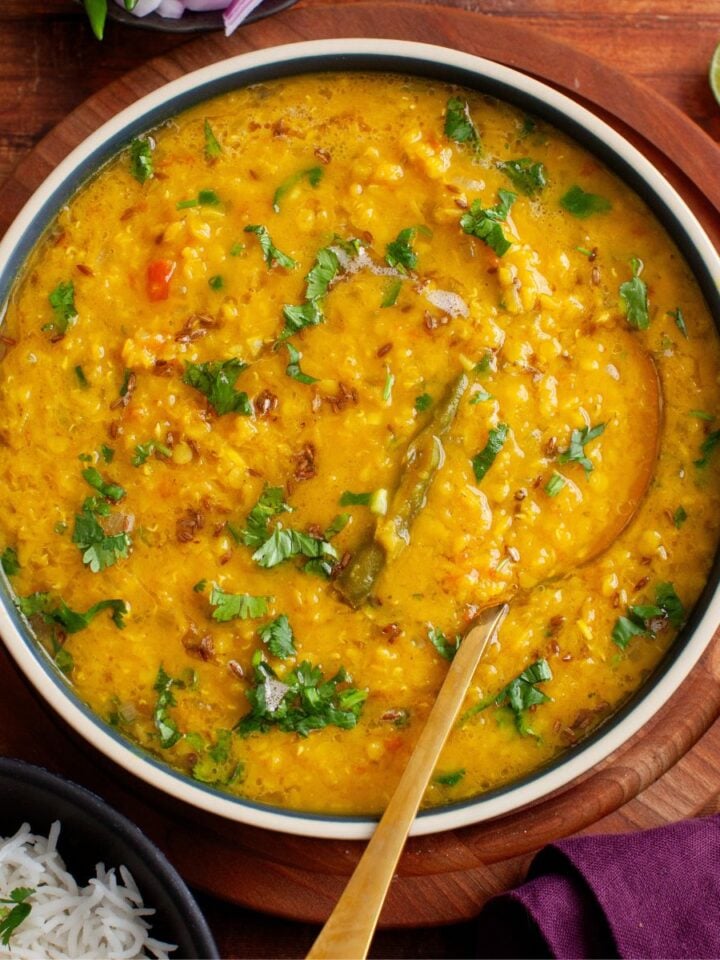
This north indian restaurant-style dal tadka features a blend of yellow lentils that are pressure-cooked to perfection and finished with a fragrant tadka of ghee-browned onions, ginger, garlic, green chilies, tomatoes, and aromatic spices. The result? A mildly smoky, incredibly comforting lentil dish that's rich in flavor. Plus, this post is packed with plenty of tips to help you achieve perfectly cooked, non-mushy dal every single time!

Save The Recipe!
If you happen to dine in India, dal is a staple. In North India, it's often a choice between kaali dal (black lentils) or yellow lentils, while the latter dominates in other parts of the country.
I grew up eating dal daily and its a tradition that continues.Cannot imagine a day without dal. Most days, I make a very simple dal(either arhar dal or masoor dal) with basic cumin and garlic tempering.
In our home, dal tadka is a special dish reserved for weekends or while hosting guests. It is rich, needs more ingredients and definitely needs bit extra work as compared to regular dal. Kids and husband love it with steamed basmati rice but I enjoy it with homemade whole wheat tandoori rotis.
4 Tips for Amazing Dal Tadka
- Soak the Dal for Just 15-20 Minutes- Any longer, and you risk mushy dal. After cooking, the dal should be creamy yet hold its texture rather than turn into a gloopy mess. Trust me, after years of making dal, I can confidently say you don't need to soak it for more than 20 minutes.
- Use Fresh Vegetables for the Tadka - This is not the time to use bottled ginger-garlic paste or canned tomatoes. Freshly chopped vegetables bring a bright, fresh taste and add texture to the dal and make a world of difference in flavor.
- Go Light on the Spices - You'll notice I've included all the essential spices found in a basic curry, but in controlled amounts. The goal is to enhance, not overpower. Dal should taste like dal, not an overly spiced curry. A mild aroma and subtle flavor are all you need.
- Don't Skimp on the Ghee - Without enough ghee, the dal will taste like plain boiled lentils - bland and lackluster. The nutty richness of ghee combined with bloomed spices is what gives dal tadka its signature depth and irresistible aroma.

Dal Tadka
In Hindi, "dal" refers to both lentils and the dishes made from them. Tadka, or tempering, enhances dal's flavor by sizzling spices like cumin, hing(asafoetida), dried chilies, garlic, and/or curry leaves in hot oil or (usually) ghee. This aromatic infusion is poured over dal as a finishing touch.
I've enjoyed dal tadka at many restaurants in both India and the U.S. and never met one I didn't like! There is no standard recipe that restaurants follow - preparations vary, from different lentil combinations to tempering spices and flavorings. So you can guess there's a lot of room for customization.
Dal tadka is great for meal prep- infact I feel it tastes better next day since the flavors get a chance to mingle for a richer and rounded taste. It is so hearty and satisfying, plus it reheats beautifully, hence making it a convenient option for busy days. So let's begin discussing my recipe, shall we?
My Recipe
- I use a mix of four lentils: arhar/toor dal (pigeon peas lentils), masoor dal (red lentils), mung dal (yellow mung lentils), and chana dal (Bengal gram lentils). Each lentil has a role to play in terms of taste and texture. That said, you can use just two types of lentils or any combination you prefer-it's entirely flexible!
- In true blue North Indian style, my dal is tempered with cumin seeds, dried chili, and hing (asafoetida) for an irresistible aroma and flavor. This classic tadka is a staple in most North Indian restaurants and dhabas (roadside diners).
- To take it up a notch, I double temper the dal, adding a final flourish of sizzling cumin & kashmiri chilli powder for that luxurious, restaurant-style richness and color. Trust me, it's worth it-this extra step elevates the taste to another level!
- Before serving, I like to top the dal with fried onions (birista) just like may restaurants do. The fried onions though optional, do add an irresistible crunch and flavor.
- Restaurants often smoke their dal tadka and you can too. I only rely on the smokiness from tadka and the onions.
Ingredients
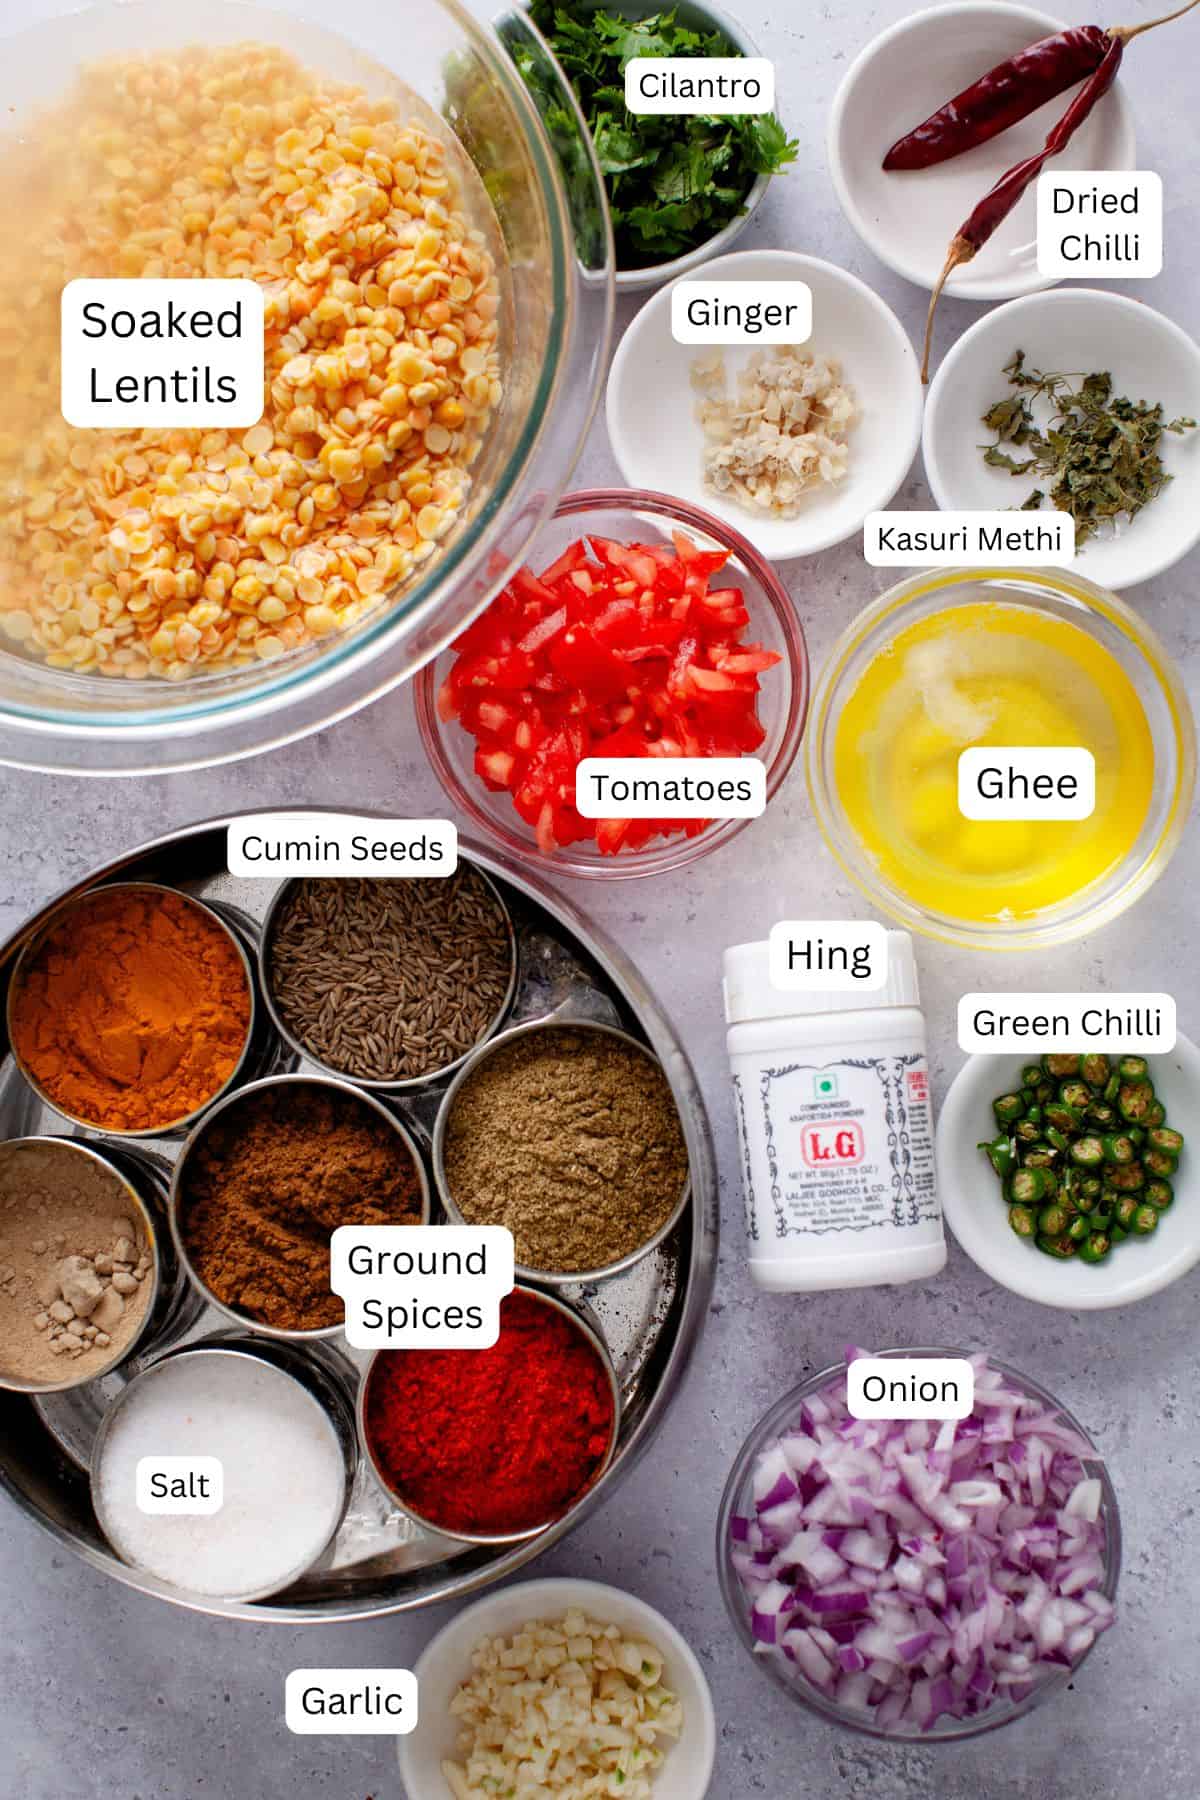
- Ghee, Hing & Cumin - Are non negotiable when it comes to tarka dal. Out of the three, you may find hing or asafoetida difficult to source without a visit to indian grocery store. Please skip it.
- Green Chilies - Use any hot green pepper like serrano or thai bird chili.
- Amchur Powder - Is dry (unripe) mango powder. It is tangy and quite savory. Sub with lemon juice.
How To Make Tadka Dal
Soak & Boil The Lentils
- Place all the lentils in a large wide plate and scan for debries or stones.
- Add the lentils to a large bowl and thoroughly wash under running cold water 3-5 times or as needed. Once the water runs clear, cover the lentils in excess water and let soak for 15-20 minutes.
- While the lentils are soaking, you can use this time for prep work. Finely chop the onion, tomatoes, ginger, garlic, cilantro and green chillies. Also measure out the ground spices in a small bowl.
- Drain the water from soaked lentils and add them to a pressure cooker or steel insert of instant pot.
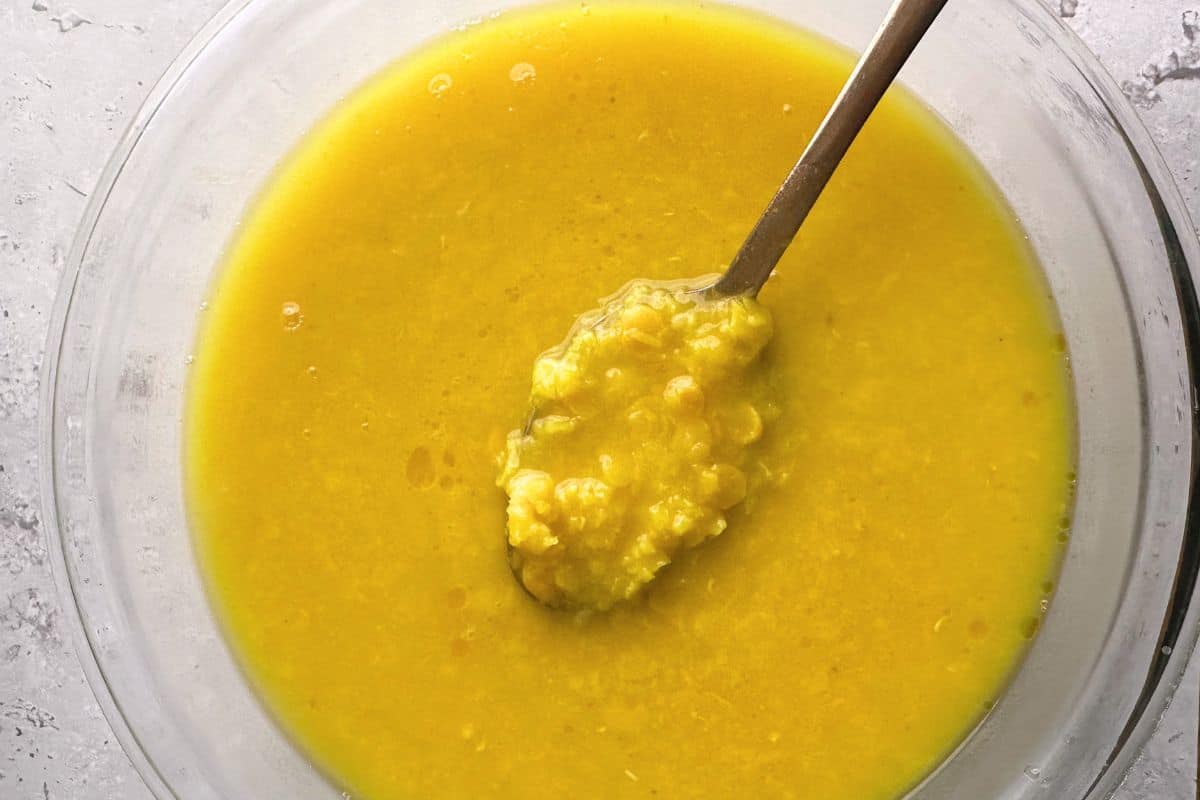
- Add salt, turmeric powder, 1 tablespoon ghee and water to the lentils.
- Close the lid of the pressure cooker or instant pot. Let pressure cook for 2-3 whistles on medium heat. In case of instant pot, let cook for 7 minutes on high pressure. Let pressure release naturally. Adjust cooking times as needed.
- Open the lid and gently mash the lentils with the back of a spoon.The lentils are hot and soft right now so they can turn gooey quickly. Try to get a balanced texture where some of the lentils break down to thicken the dal while (mostly) the chana dal grains remain intact for a slight bite.

Temper The Lentils
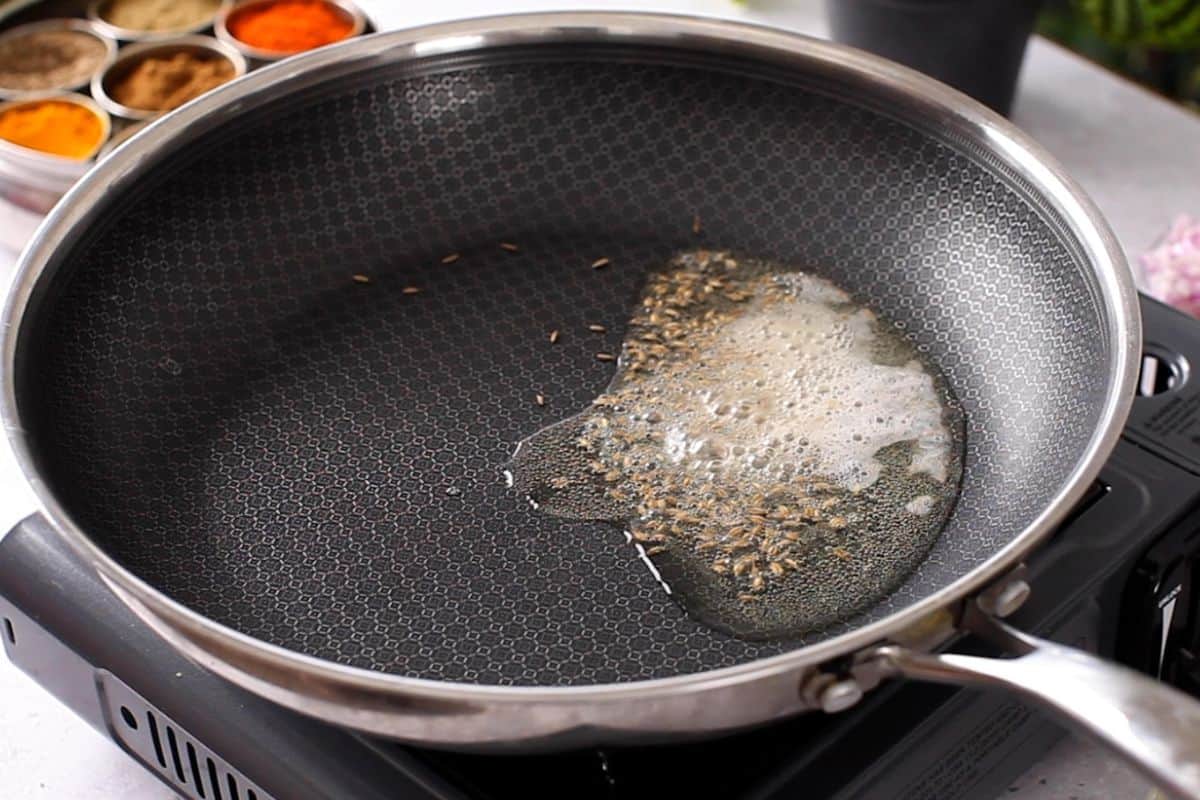
- Add ghee to the skillet and let melt on low medium heat. Temper the ghee with cumin seeds and hing. Let cumin crackle taking care not to burn it.
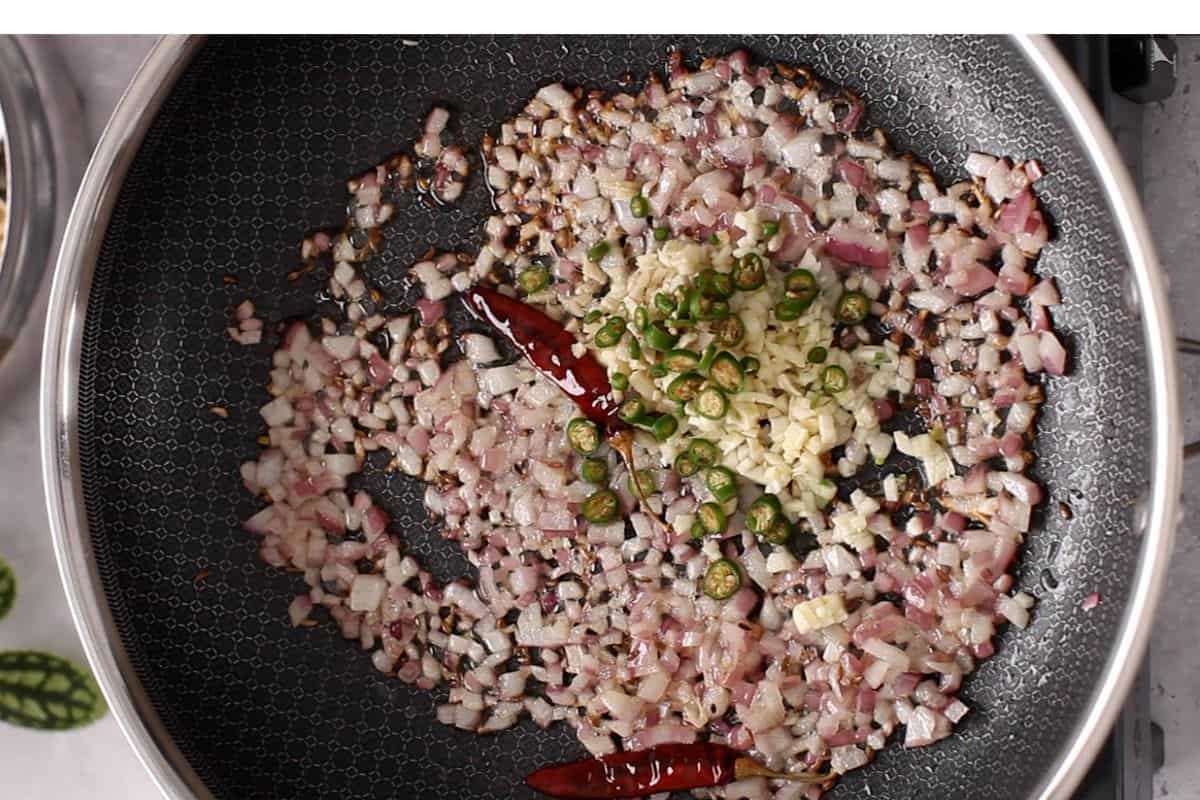
- Add the chopped onions and dried whole chilli. Fry the onions until they begin lightly changing color. Don't brown.

- Next, add the chopped garlic, ginger and chopped green chilies. Fry with onions for 30-40 seconds.
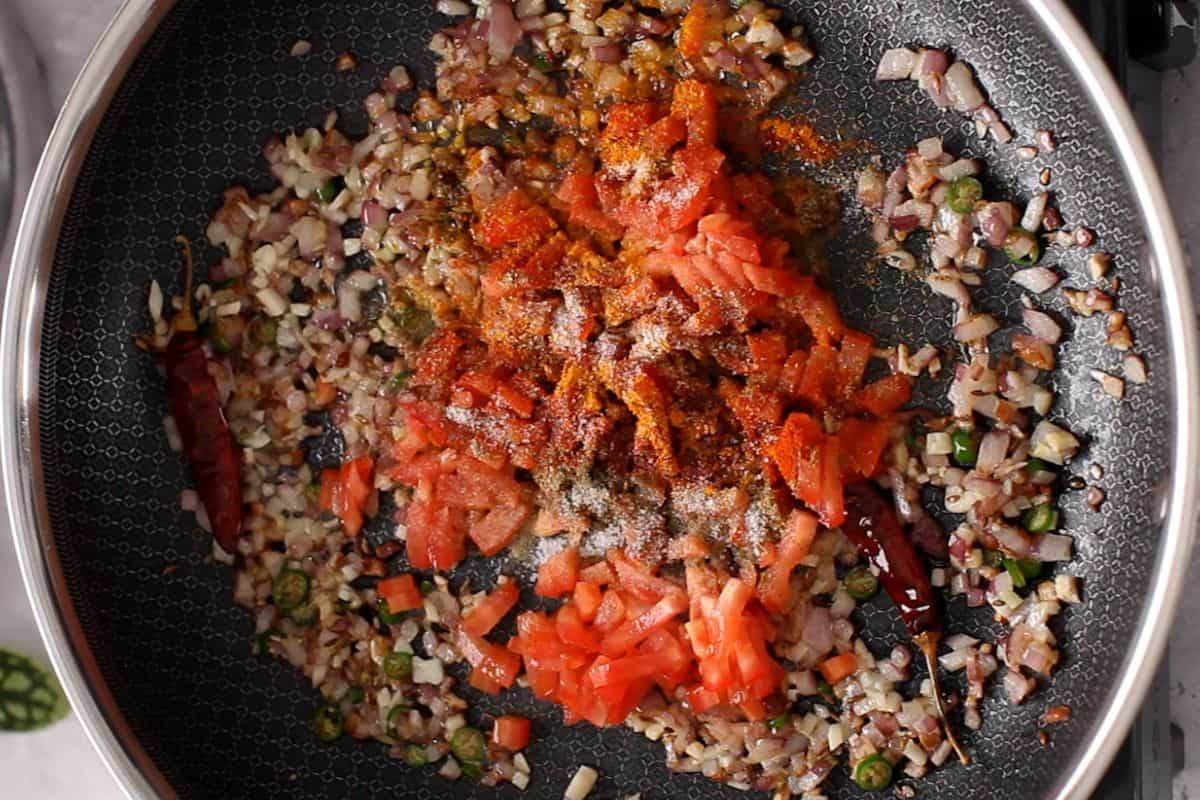
- Add the tomatoes next and sprinkle the ground spices - coriander powder, red chili powder, turmeric powder and salt. Mix and let the tomatoes soften slightly. Don't cook down or dry out the tomatoes.
- Pour the cooked dal into the skillet and mix well. Add ⅓ to ½ cup water if needed to adjust the consistency, keeping in mind that dal tadka is thickish, so avoid thinning it out too much. Bring the dal to a gentle boil, then reduce the heat to low and let it simmer for 7-8 minutes to allow the flavors to develop.


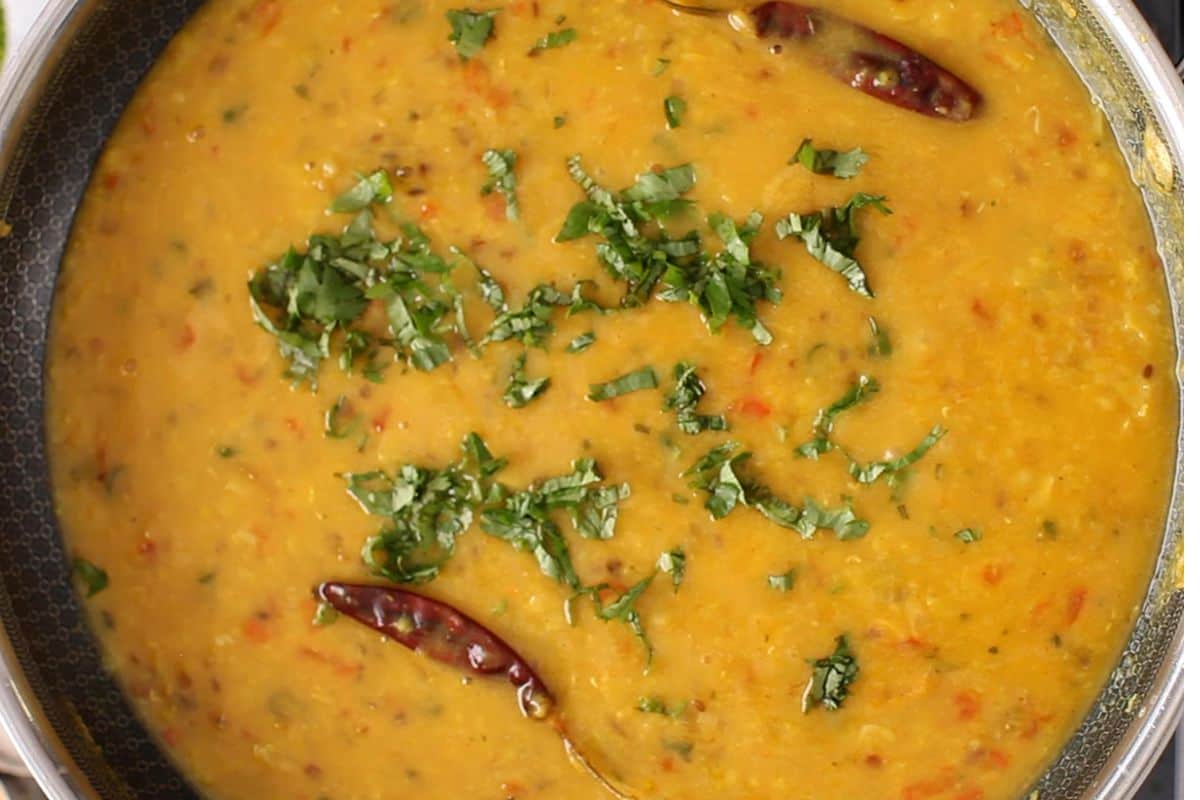
- Finish the dal with chopped cilantro, amchur powder(or lemon juice). garam masala powder, and crushed kasuri methi. For an extra layer of flavor, heat a small amount of ghee or oil in a pan, add cumin seeds, and let them crackle.
- Turn off the heat, stir in red chili powder, and immediately pour this tempering over the dal. Stir gently before serving.

Recipe Tips
- If possible, choose a wide skillet (I use my 12 inch hybrid skillet) for tempering the dal. The reason is that a wider surface area ensures that the spices bloom evenly and allows for better evaporation helping to intensify flavors and create a more flavorful tempering.
- Curry leaves or black mustard seeds are not common in north indian dal recipes. if you prefer them, add in the tadka.
- Use any neutral tasting oil in this recipe instead of ghee for vegan version. Coconut oil is not a good choice since it will make dal taste of coconut(unless you prefer so).
- Dal tadka has a pourable but thick consistency, so avoid thinning it out too much. That said, as the dal rests, it will thicken considerably so make sure its not very thick to begin with.


Homemade Dal Tadka - Just Like Restaurants!
Equipment
- Pressure Cooker or Instant Pot
Ingredients
- ⅓ cup toor dal/arhar split pigeon pea lentils
- ¼ cup laal masoor dal red lentils,husked & split
- 2 tablespoon yellow moong dal golden lentils (split )
- 2 tablespoon chana dal bengal gram lentils
- 2.5-3 cup water or as needed to adjust consistency later
- 1 teaspoon ghee
- ¼ teaspoon turmeric powder
- ¾ teaspoon salt or to taste
For Tadka (Tempering)
- 3 tablespoon ghee or use oil for vegan
- 1 teaspoon cumin seeds
- ¼ teaspoon hing asafoetida
- 1 medium (~100g) onion finely chopped (I use red onion)
- 2 whole dried kashmiri red chilies use 1 if its big in size
- 1 tablespoon garlic finely chopped
- 1 teaspoon fresh ginger finely chopped, optional
- 2 green chilies (hot!), finely chopped, adjust to taste
- 1 medium (~70g) tomato finely chopped (I use roma tomato)
- ½ teaspoon kasuri methi (skip if not available)
Ground Spices
- ¼ teaspoon turmeric powder
- ½ teaspoon red chili powder (medium hot)adjust to taste, I use degi mirch
- ½ teaspoon coriander powder
- ¼ teaspoon amchur dry mango powder (or use lemon juice to taste )
- ¼ teaspoon garam masala powder
Second Tadka
- 1 tablespoon ghee
- ¼ teaspoon cumin seeds
- ½ teaspoon kashmiri chilli powder
Instructions
SOAK & BOIL THE LENTILS
- Place the lentils in a large wide plate and scan for small stones.
- Add the lentils to a large bowl and thoroughly wash under running cold water 3-5 times or as needed. Once the water runs clear, cover the lentils in excess water and let soak for 15-20 minutes.
- While the lentils are soaking, you can use this time for prep work. Finely chop the onion, tomatoes, ginger, garlic, cilantro and green chillies. Also measure out the ground spices in a small bowl.
- Drain the water from soaked lentils and add them to a pressure cooker or steel insert of instant pot.
- Add salt, turmeric powder, 1 tablespoon ghee and water to the lentils
- Close the lid of the pressure cooker or instant pot. Let pressure cook for 2-3 whistles on medium heat. In case of instant pot, let cook for 7 minutes on high pressure. Let pressure release naturally. Adjust cooking times as needed.
- Open the lid and gently mash the lentils with the back of a spoon.The lentils are hot and soft right now so they can turn gooey quickly. Aim for a balanced texture where some of the lentils break down to thicken the dal while the chana dal grains remain intact for a slight bite.
TEMPER THE LENTILS
- Add ghee to the skillet and let melt on low medium heat. Temper the ghee with cumin seeds and hing. Let cumin crackle taking care not to burn it.
- Add the chopped onions and dried whole chilli. Fry the onions until they begin changing color. Don't brown.
- Make the tadka. In a small sauce pan, heat up the ghee. Add the cumin seeds and let crackle.
- Next, add the chopped garlic, ginger and green chilies. Fry with onions for 30-40 seconds.
- Add the tomatoes next and sprinkle the ground spices - coriander powder, red chili powder, turmeric powder and salt. Mix and let the tomatoes soften slightly. Don't cook down or dry out the tomatoes.
- Pour the cooked dal into the skillet and mix well. Add ⅓ to ½ cup water if needed to adjust the consistency. Bring the dal to a gentle boil, then reduce the heat to low and let it simmer for 7-8 minutes to allow the flavors to develop.
- Finish the dal with chopped cilantro, garam masala powder, and crushed kasuri methi. For an extra layer of flavor, heat a small amount of ghee or oil in a pan, add cumin seeds, and let them crackle.
- Turn off the heat, stir in red chili powder, and immediately pour this second tempering over the dal.
- Top the dal tadka with more fresh cilantro and fried onions (if using) before serving.
Video
Notes
- If possible, choose a wide skillet (I use my 12 inch hybrid skillet) for tempering the dal. The reason is that a wider surface area ensures that the spices bloom evenly and allows for better evaporation helping to intensify flavors and create a more flavorful tempering.
- Curry leaves or black mustard seeds are not common in north indian dal recipes. if you prefer them, add in the tadka.
- Use any neutral tasting oil in this recipe instead of ghee for vegan version. Coconut oil is not a good choice since it will make dal taste of coconut(unless you prefer so).
- Dal tadka has a pourable but thick consistency, so avoid thinning it out too much. That said, as the dal rests, it will thicken considerably so make sure its not very thick to begin with.


I'd Love to Hear from You!